
We often talk about the purchase of a trail camera as an investment not only in your money, but also in your time and effort. Much like the investment of a lawn mower that needs gas, an oil change, blades sharpened, and spark plugs replaced, trail cameras need consistent maintenance to operate at its highest level. Yet most trail camera owners don’t take the time to do so. I
n doing out part to help you with this problem we have created simple routine maintenance checklists before you use your camera, in the field maintenance, and when taking your camera out of the field, that every trail camera needs for optimal performance.
Before You Use Your Camera
When you but a new camera, it is natural to want to slap a few batteries into it and set it in the field. But before you do, be sure to follow these simple steps to ensure your are able to get the most out of your cameras
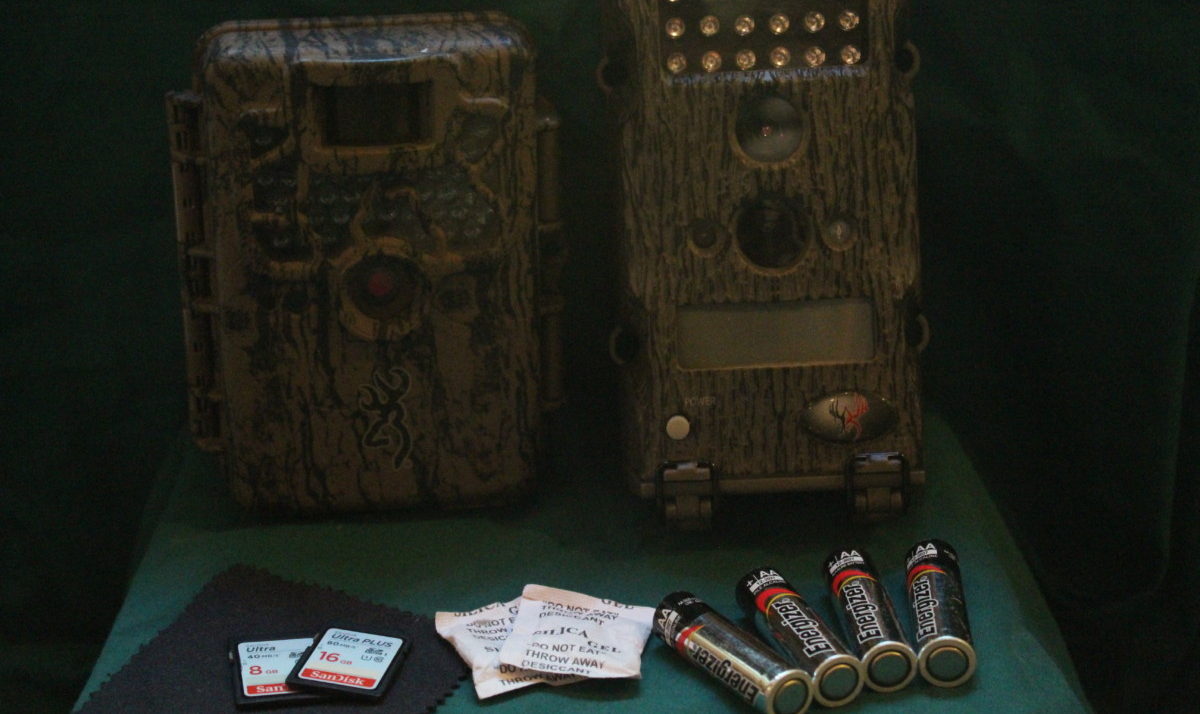
- Buy and install NEW betteries
- Buy, and format NEW SD card
- Update the Trail Camera’s Firmware
- Set the Info Strip
- Test it
Buy and Install New Batteries
Batteries are the life blood of your camera. Without a power source, obviously the electronic device will not so much as power on. There are plenty of options to choose from when selecting a battery from, Alkaline and lithium to rechargeable and external power packs.
Regardless of which power source you choose for your camera, there are some basic guidelines to check before heading into the field.
- Do not mix battery brands– Choosing the brand of battery, whether it be Energizer, Duracell, Rayovac, or any other doesn’t matter nearly as much as only using that one brand. Mixing brands can be harmful to your device. It may cause reduction in performance, as well as leakage from the batteries.
- Do not mix old and new batteries– Any battery powered device, your trail camera included, is limited by the weakest battery in the device. For instance most cameras on today’s market run on 12 volts. That is the amount of power needed to create optimal performance. A single AA alkaline battery produces 1.5 volts. Over time alkaline batteries begin to wear down and lose their maximum voltage. If you have 6 brand new batteries running at 1.5 volts and add two already used batteries that are only producing 1.2 volts you are essentially running a 12 volt device on 11.4volts. It might not seem like much, but that loss of power will affect not only your detection distances and flash range, but your trigger speeds and recovery times.
- Just Buy New– The only way to avoid all of these problems is just to go out and buy a new set of batteries. When you buy in bulk, they tend to be a little cheaper, and then you will always have a new set of matching batteries when you need them.
Buy, Install, and Format New SD Cards
SD cards are essentially the memory for your entire unit. Without one, well, whats the point? Choosing the right SD card for your trail camera is not too complicated, and keeping them maintained is even easier.
Buying an SD Card
It is important to read the manufacturer’s recommendations for SD cards. The storage capacity for SD cards range anywhere from 2GB to 256GB but most trail cameras maximum capacity is around 32-64GB. Obviously the more capacity your card has, the more pictures and videos it will be able to store.
Each SD card has what is called a class rating. The class rating is always between a 2 and a 10 rating, and is displayed on the front of the card with a circle around it. The difference in class ratings is very simple, the number represents the the amount of sustainable gigabytes your camera can transfer to the card per second. For example a class 2 card can transfer 2GB/second and a class 10 can transfer 10GB/second. This rating can be very important to the function of your camera, especially if you are trying to record HD videos, or use rapid burst still photos with a quick trigger speed.
The best advice is to just buy the class 10 card, you will never regret it.
Formatting an SD Card
This is a common mistake I made when I first started running trail cameras; I never formatted my cards to the camera. Formatting is actually a very simple and quick process, that helps with speed performance, preserving its storage capacities, and reducing risks of storage errors.
When you format a card, it is simply just deleting all of the files and pictures that are not related to your camera. For instance, over time, if you were to run the same SD card in multiple different cameras, such as an Exodus, a Bushnell, and a Cuddeback. Each one of those cameras will create a file specifically for that camera on the SD card.
When you check those pictures on a mobile device such as an Android or iPhone often those devices will create folders of their own as well. If you were to format that card to your next camera, lets say a Browning, it will delete all of those files and create one specifically for your camera. In this case the file would be named BTC (Browning Trail Camera).
While the process of formatting a card may be specific to each individual camera, typically there is a formatting option within the camera’s menu. It is best to read the owners manual and follow the specific instructions to guarantee best results.
Update Firmware
Updating firmware is possibly the most overlooked aspect of keeping up with maintenance on your trail camera. There is a lot of misunderstanding of what firmware truly is, and often becomes interchanged with the term software. The main difference is software can be installed and uninstalled among many different types of devices. Take Microsoft operating systems for example. Microsoft can be installed and operated across a wide variety of computers. Firmware on the other hand is designed specifically for one device.
Just like software however, over time the manufacturer will find bugs, weaknesses, or breakdowns in the firmware, that need to be fixed in order to keep the camera working at an optimal level. Firmware updates are a free service provided by the manufacturer, all you need to do is install it on your trail camera.
Set Info Strip
While setting your info strip with the correct date, time, and camera ID might not be maintenance as much is it is setting up your camera, it is important to make sure that these features are in working order. The data strip at the bottom of your images can be the most important information on a trail camera. Assuring this information is correct and the clock and calendar is keeping good time, is important to use of your camera.
Test Your Trail Camera
This might seem obvious but the only way that you will know that your trail camera is working properly is by testing it. Hang your camera on a tree near your driveway, or on a chair in your kitchen. After a few days, check the pictures. Make sure that the data strip is reading correctly, the pictures are loading on to your SD card properly, and the settings are doing what they are suppose to.
Without testing the camera first, you are simply hoping that it works correctly rather than knowing. Once you know you are ready for the field.
In the Field Maintenance
For most people it is very simple to maintain a trail camera when it is at home, but the most important time to keep up with a trail camera’s maintenance is when it is in the field
Here are a few things you should do when checking cameras in the field, that will help maintain your trail camera’s quality.
- Pack a Field Bag
- Keep Batteries Fresh
- Keep internal components dry
- Clean your lens
- Format SD card
- Check for Insects
- View photos on site
Pack a Field Bag
Most outdoorsmen have one bag for everything. That same bag is used for carrying hunting gear, hiking, camping, and packing trail cameras in and out of the woods. The problem with this is while these packs can be extremely versatile, packing a bag of cameras is not quite the same as cramming a handful of folding saws and tent stakes deep into a pack. Trail cameras are electronic devices that when banged and bumped around can become damaged. Lenses can crack, wires can come loose, and buttons can break. Make the investment of purchasing a camera bag. It is well worth it.
Having a separate bag that is specifically designed to carry your trail camera gear will save you the problem of forgetting to pack something that you might need. Aside from the cameras themselves, you can have a designated place for batteries, SD cards, pruning sheers, micro fiber cloths, card readers, desiccant packs and owners manuals. Everything you need is always with you in the field. Here are a few packs that I recommend checking out that will give you diversity with carrying your gear.
Keep Batteries Fresh
We have already touched on the main points about batteries in the first checklist, but it is important to reiterate that as Alkaline batteries use energy, they begin to produce less energy output. While at the same time, Lithium batteries always produce maximum output until they are out of energy, then they just die. Understand the batteries you have, and keep an eye on the battery levels in your camera, and how they will impact the functions of it.
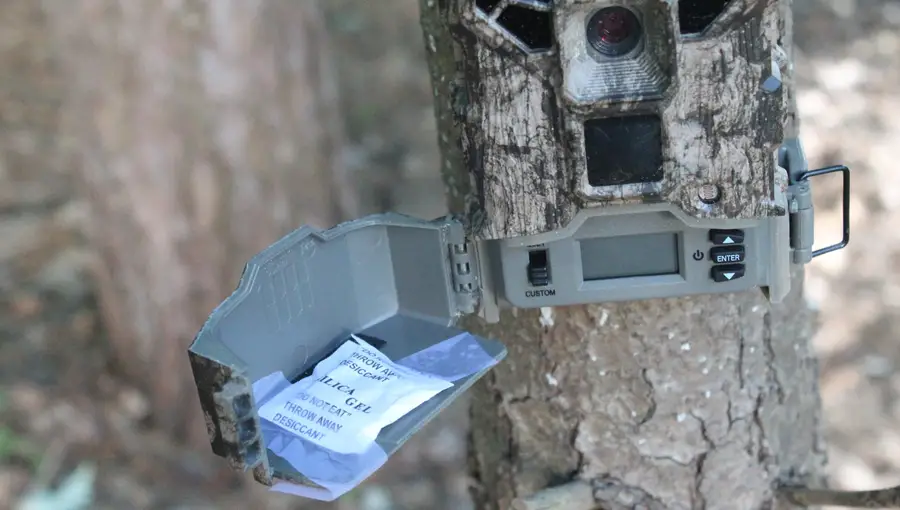
Keep Components Dry
Trail cameras are designed to be weather resistant. They shouldn’t allow water to leak into the housing unit, but humidity often finds ways of getting you into trouble. Certain landscapes such as low lying swamps, marshes, and near stagnate water, along with geographical locations like the deep south or the north western coastline, tend to be more prone to humidity.
Be sure to check the inside of your trail camera’s housing to make sure that there isn’t any moisture build up. This may sound obvious but electronics and moisture is a horrible combination. The retained water can reap havoc on everything that your camera needs to operate such as wires, SD cards, batteries, lenses, and circuit boards.
If there is a moisture problem, the easiest solution is to invest in some Silica Gel desiccant packages. The Silica gel can absorb up to 40% of its weight in moisture, and is relatively inexpensive for small 3 gram size packages.
Clean your Lenses
When it comes to quality of a picture, there is nothing more important then the lens of the camera. As trail cameras sit in the field for days on end, with weather, dirt, and pollen blowing around, it is often common that the lens becomes dirty and smudged. Simply using a microfiber cloth to wipe the lens each and every time you visit the camera will keep the build up of foreign objects off your lens. Its a small simple thing that makes the world of difference in quality of pictures.
Format SD Card
Again, we have already gone into great detail about the importance of formatting your SD card. When switching out cards in the field, it is an easy step to miss. Just be sure that each and every time you place a new SD card into your trail camera, you format that card to the camera.
Check for Insects
You probably wont have to check for insects, you will be able to notice the problem the moment you get into view of your camera. Ants, flies, and ladybugs, for one reason or another tend to be attracted to cameras, crawling all over the lenses and the motion detection, will create thousands of pictures of your new nemesis.
Using bug sprays seems like the obvious choice to rid yourself from this problem, but if you are running trail cameras, the chances are you are conscious about leaving any scent around the area, let alone anything that smells as potent as bug spray. There are however a few tricks you can use to deter these small pests from visiting your trail camera.
Wrap a fly strip around the tree about a foot above and below your camera. While this might not stop flying insects, the sticky strips will keep most of the ants from climbing up and down the tree your camera is on.
Camouflage your camera with bay leaves. You’re not actually trying to hide your camera from insects, but dried bay leaves repel insects. The science behind why insects avoid them, but the results is all that matters at this point. Just drape the bay leaves, that you can purchase at any grocery store, around the camera, using tape, string or any other method to hold them in place. If it creates a realistic looking camouflage cover; bonus.
Check Pictures on Site
When approaching your camera, always walk in front of it, to assure that it is working. You will get a picture that has a date stamp and time to the exact moment you walked up. This allows you to make sure that not only is the camera working properly, but all of the data strip information is correct.
Be sure to check a few photos(with these SD card readers) especially the last few of you walking up before you leave the area. There are many accessories on the market from trail camera viewers, to devices that connect them to your phone. The important thing is to make sure that everything is working the way you intended it to.
Check the angle of the photos to make sure that you are getting the entire targeted animal within the frame of the picture. If you are getting only the back end of an animal, readjust your camera to get a better angle on your approaching query. Pay attention to the settings and ask yourself questions about how to get better pictures. Would backing up the camera give me a wider angle? Would more photos in burst mode allow me to see the animals trail behind? Questions like these will allow you to fine tune your setup, resulting in better pictures.
Taking Your Camera out of the Field
At the end of the year when you bring your trail cameras in, there are just a few basic things to remember to do to make sure they are ready for next year.
- Remove batteries and SD Cards
- Clean Your Trail Camera
- Store Your Camera in a save enviornment
Remove Batteries and SD Cards
At the end of the year, take your batteries out. It is likely that at some point along the way we have all seen an electronic device that we left the batteries just sit it. They become corroded and begin to leak. That substance that leaks is acidic ammonium chloride, and it can be damaging to your trail camera.
While you are at it, take out your SD cards, and store them away. While keeping them in the trail cameras during storage doesn’t have any affect on their longevity, taking the time to storing your SD cards together, will allow you to know exactly where they are, and how many you have and need, the following season.
Clean
After months of being in the field, it is pretty certain that your trail camera will pick up dust, dirt, and pollen in every nook and crevice that you could possibly think of. Before you retire the camera for the off season, take a lightly moistened toothbrush, or Q-tip and clean out every bit of debris your camera has picked up. Avoid getting any water in areas that hold electronic components like the SD card slot and the battery trays. After you are done with a thorough cleaning, leave your camera out to dry. Putting away a wet camera can result in mildew growth.
Store Your Trail Camera
Storing your camera is as simple as it sounds. Keep the camera from other electronic devices that may generate a magnetic field. Long term exposure can cause damage to the electronic components to your camera. Store you camera with silica gel desiccant packages as well. This will avoid any moisture build up causing long term damage to your camera.
Like any tool, a trail camera needs a little maintenance to ensure it is working at optimal levels. A little time and effort with ensure your investment will be in the field for years to come.