
Hunting public land can be a challenge. Expansive terrain, public pressure, and simply finding an area that holds mature whitetails, each create their own challenges. Simply flipping through magazines or turning on your television, you might get the idea that there is a mature buck behind every tree. For those who focus their hunting season on public land, you know that this just isn’t the case.
While these conventional avenues of information can be a benefit to you once you locate areas with mature deer, it is extremely difficult for an average hunter to find the time within their busy life to put in the time to find these areas, especially on public land. This is when having a solid trail camera strategy can increase your odds.
As the first part of a 3 part series on using trail cameras on public land, we dive into the the art of using trail cameras to find areas with mature deer. From the very beginning of choosing a location on a map, getting boots on the ground, and creating a trail camera strategy, you will have all the tools to finding mature deer.
Part 2 of using trail cameras on public land is focused around backtracking bucks which you can read here. In Part 3 we will discuss how to analyze the data, giving you the best opportunities come fall.
Using trail cameras in strategic locations on public land, and giving those cameras a long time to soak, can give the average hunter a better understanding of the quality of bucks the property can hold.
What To Look For
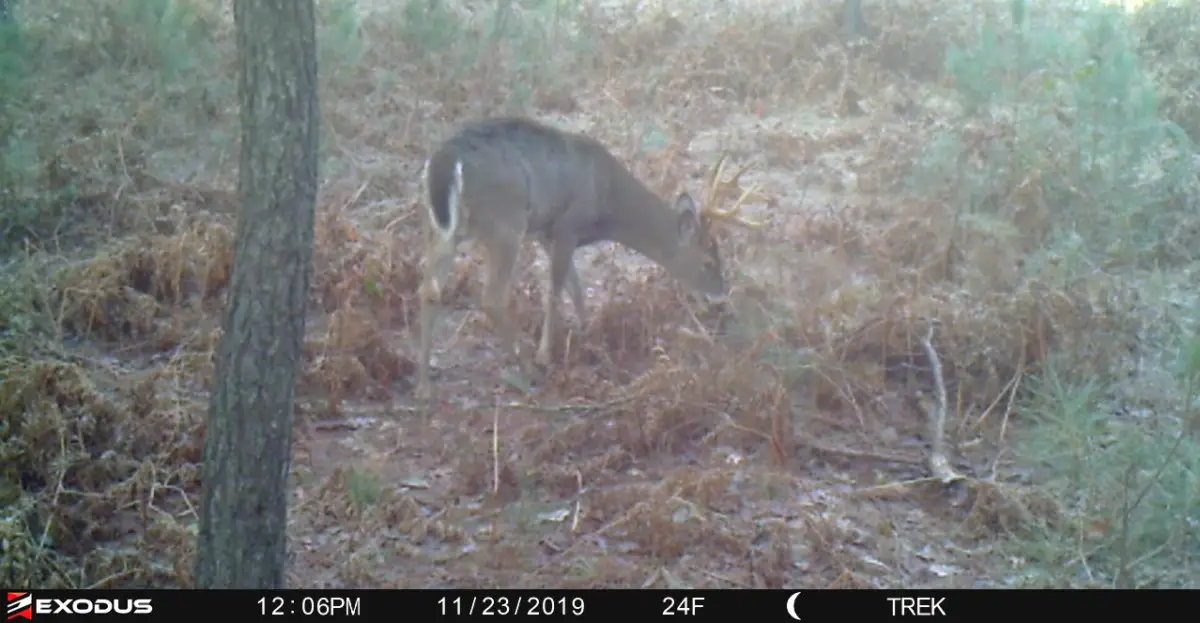
From my experience of hunting Michigan, where reports have shown that 4 bucks are harvested every square mile, and 80% of those bucks are 2 1/2 years old are younger, there are only two ways a deer is able to reach maturity:
- They are extremely savvy from day one at avoiding people. Which in the end becomes problematic when trying to hunt.
- They live in areas, or pockets of areas, that have little to no hunting pressure
That is it. It doesn’t mean that mature deer are not around. It simply means that you have to know where to look.
Avoiding Visible Deer
When I first began bow hunting just after college, I took the approach of finding deer on their summer patterns from behind the wheel of my pickup truck. After weeks of driving dirt roads I finally got onto a buck that was not only mature, but in my opinion was very killable.
I would watch him every night leave a bedding area on public land and enter a privately owned soybean field. He followed a slight saddle across the field to a small hedge row and slipped from the soybeans to another field filled with corn. And every morning he would take the same route back into bedding.
I thoroughly prepped and planed my attack, having the best access route I could find, and setting up in what to this day I still believe is the best tree for that hunt.
On opening day I slipped into that set 2 hours before daylight, making sure everything was in perfect order before the sun began to break across the horizon.
At the time of day, when the dark woods, began to slightly turn to gray colors, I could see movement along the edge of the soybeans. I pulled up my binoculars only to see a fellow hunter trouncing across the open soybean field, heading to his stand.
After another hour or so of waiting for a deer that had obviously been altered from his original patterns I slipped out of my stand and made my way back to my truck. What I found was a complete eye opener to what hunting pressure really was. Aside from my truck there were seven other vehicles parked along the road of this small 40 acre parcel. Seven!
Aside from wondering what the guy who showed up last was thinking, I realized that in highly pressured areas that if a deer is visible in fields he will attract a host of attention. Making it virtually impossible to pattern him successfully. So, if you live in a high pressured area, avoid small tracks of public, and refrain from chasing after those deer that are easily seen from the road.
Overlooked Areas
One of the best ways to find mature bucks on public ground is to find those areas in which everyone else overlooks. You will often hear some of the better known hunting personalities talk about setting up next to parking areas and finding islands of high ground in the cattail marshes. These areas are undoubtedly gold mines, but there are five characteristics of a piece of public that I look for when doing virtual scouting.
- Transitions
- Water
- Food sources
- Topographical Terrain features
- Distance, Depth and Access
Virtual Scouting
Ultimately we will rely heavily on trail cameras to give us the needed information of an area (more on that in a moment), it is still up to us to figure out where to place the cameras in order to receive the most information.
In order to effectively explain the different characteristics to look for on public land I am going to use this large piece of public land from Michigan’s Upper Peninsula. You can use this blank map as a reference moving forward.
Tools
When scouting public land there is nothing more important than virtual scouting. This gives you the ability to break down a property from a 10,000 foot view, allowing you to pinpoint exact locations you need to scout before you even step foot in the field.
Just as important as virtual scouting, is the tools you use to do so. Here is a break down of the most important tools you should be using to break down your next public land spot.
Google Earth
By now everyone should know that Google Earth is a collection of aerial imagery of virtually every inch of the worlds surface. You can zoom into areas to see a basic overlay of what a particular area looks like, or even drill in further and check out individual trees and trails. You can also use some of the added features to draw lines and leave way points.
One of the most overlooked features of Google Earth is the historical imagery. As you begin to use this feature you can find older images from different times of the year, which may give you views of a given location when leaves have fallen from the trees. This type of visual imagery can allow you to see individual deer trails that cut through the forest floor, giving you historical insight of how deer have used the land throughout the years, which is an incredible place to begin to understand a new parcel.
GIS Maps
Geographic Information System (GIS) maps, are government accessible maps that allow you to see property borders, and ownership. This is a great tool to use simply to find public land property. If you spend enough time sifting through these maps, you are likely to find small access routes and properties that are open to the public that most people are not aware of.
The easiest way to find GIS maps for your area is to simply Google your county’s GIS, and you will likely find the government site for your particular area.
Topographical Maps
Topographical maps give you the ability to see elevation changes in a specific area. There is a lot of information you can learn from topo maps including, natural draws and pinch points, saddles and ridge lines. The more time you spend looking at and reading topographical maps the easier it is to pinpoint these types of locations.
For topographical maps, the one site I really enjoy is hillmap.com. This site gives you a split screen of aerial imagery and topographical maps, allowing you compare transitions in tree cover with transitions in elevation, giving you the most information you can find in one place.
Vegetation Maps
Vegetation Maps are my single most favorite map to look at. A vegetation maps is exactly what it sounds like: a map that gives you the different types of vegetation (trees and grasses) in a given area. Using these maps allows you to find small pockets of oaks, conifers, aspen, and many other variety of forest cover in your area.
Often times you can use these maps to find food sources, bedding cover, and travel corridors just by looking at the transition of cover within an area.
Let me be honest, these maps are not the easiest maps to get your hands on. Its not as simple as Googling for a GIS map. You will have to do some digging to find these maps for your area. NASA and the US Forestry Service websites are a good place to start, but most likely you will will have to search within your state and country websites to locate them.
OnX Maps
Most likely you have heard or even used Onx maps by now. For a small yearly fee, in my opinion is the best GPS capable mapping system on the market. With numerous different layers, you can get versions of almost all of the different maps listed above, including layers for areas that have been clear cut, burned, and different options for ATV, and hiking trails.
The most important feature of this app however is the ability to use as a GPS in the field. You can mark waypoints, travel routes, and anything else you find interesting. You can create a scouting map at home from their basecamp, and download the map into your cell phone, giving you the ability to make sure you check each and every place of interest.
Transitions
Transitions within the woods are often overlooked areas that can create excellent natural funnels. Deer in general are creatures of edge. It is easiest seen along field edges where deer will travel the edge of the field just inside the security of cover.
The same traveling characteristics happen within the woods, where two different types of habitat come together. This can be anything from the change in diversified forests, or a slight change in the age structure of trees. It can be very difficult to spot, and takes some practice to acquire a keen eye for the slight transitions within forests.
Using the original aerial photo you can see visual changes in the color and density of forest. Using the OnX mapping system, I drew lines along those visible transitions. As you can see the visual lines of edge within this parcel of public land mostly go North and South, giving you a good general idea of the direction that most deer will follow.
The visual of aerial photography doesn’t always show the entire picture though. This is when it is important to turn to vegetation maps. A good vegetation map will show you the small pockets of diversified forests, giving you yet another opportunity to see small subtle transitions within a given area.
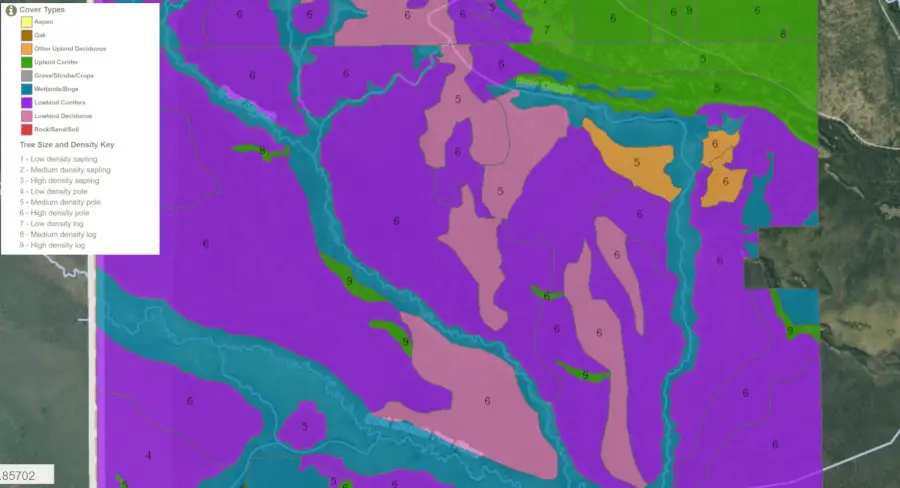
As you can see from the above map, we were able to see some of the more defined transitions between types of vegetations from the aerial maps. What we were unable to see was the small pockets of upland conifers that line the river banks.
Water
Water is an obvious attractant to deer. They not only have the ability to take a quick drink, but it also often gives them the ability to use the water as a way to collect wind currents, or thermals, that carry scent down stream. In my opinion water is one of the most important features a block of public land can have.
Rivers and Streams
From a trail camera standpoint, flowing water from a river or stream gives you two distinct advantages when it comes to locating mature whitetails:
- People in general are unwilling to cross water. Now I am not saying that people will not, but just having a water feature, even if it is ankle deep, is a deterrent for most people to cross. This gives you the ability to leave a large portion of other hunters on one side of a body of water.
- Water creates natural pinch points in which deer will naturally funnel through. As you know not every place along a river is easy to cross, some are too deep, others may have steep embankments, or incredibly thick vegetation. Deer, similar to humans often look for the easiest places to cross, those areas that will take less energy.
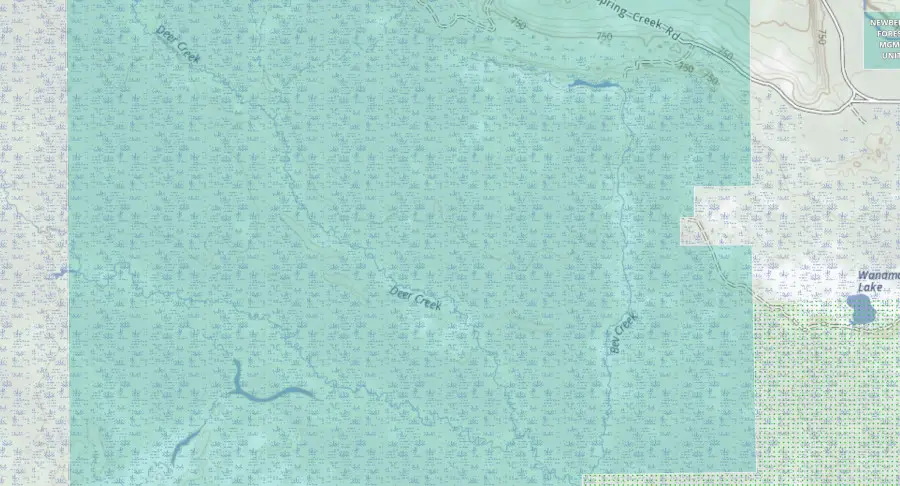
Using your aerial maps, locating rivers and streams is generally very simple. But in certain areas where the vegetation is extremely thick it might not be as easy to pinpoint. In those situations, you can simply turn off the aerial view and use the Topographical maps on OnX.
While in this situation you were able to easily see the creeks on the aerial map, you can see how turning them off allows you to get a more clear view of them.
Ponds, Lakes, and Watering Holes
Using maps is easy to locate lakes and ponds within a parcel. Whether it be a large lake or a small watering hole it is essential to take note of these areas, especially ones that are deep within cover. They tend to attract deer during warm weather, when deer need to replenish fluids and keep cool.
This particular map that we are using doesn’t have any ponds or watering holes, aside from a few places where the creek pools up. Take note of these areas though, as some of the larger bucks I have gotten trail camera photos of have been at watering holes during late summer months when many other water sources begin to dry up.
Swamp Islands
Islands that are within swamp, and marshes are great locations for deer to bed. It provides them the security they need to stay away from predators, and the high ground the require in order to bed out of the water.
While, at this point in the game, we don’t need to got a mile into a swamp to climb up onto an island to find deer, we do need to take note of them. While deer will use the islands to bed, they will need to enter and exit the islands in search of food. Paying attention to these routes will provide excellent places for trail camera placement.
Again, while this map parcel doesn’t have specific islands, it does have small points that protrude into the marsh. These areas work in very similar fashion as deer use the surrounding water around the points to secure themselves, and use the wind to protect themselves from any possible predator.
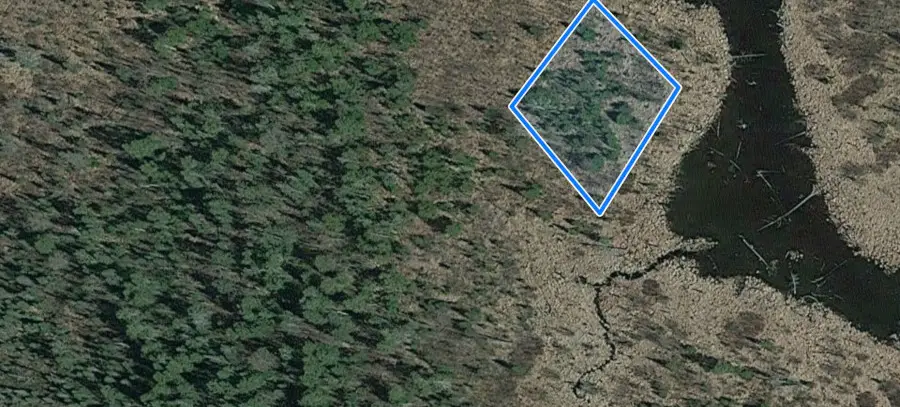
If you look at the northern section of this aerial you will notice a small peninsula from the main land that jets out into the river bottom.
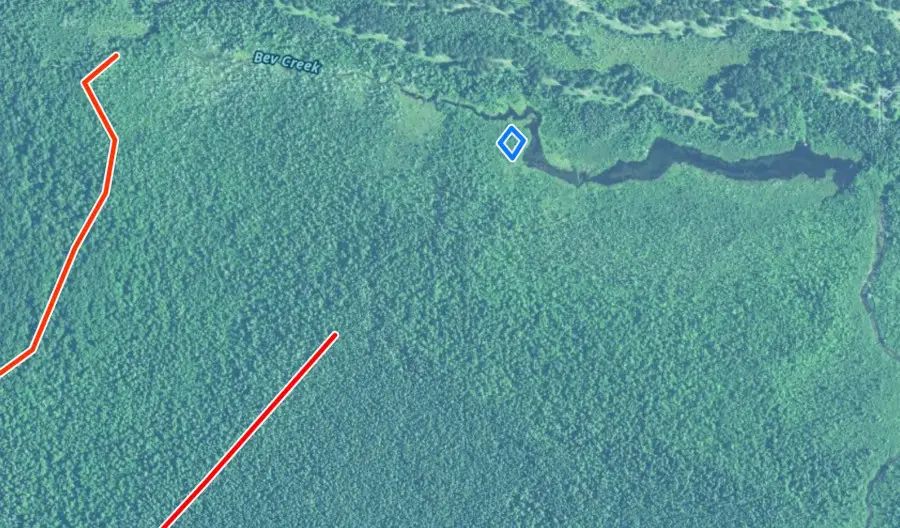
When you zoom in on the area you will notice that the peninsula is creates a cluster of trees. If you were to use google maps, you will have the ability filter through to see historical aerial photos and be able to pinpoint exact trails that deer are using to access this location.
Food Sources
Food sources in a whitetail woods can sometimes become difficult to pin down. 80% of a deer’s daily diet comes from browse, meaning any low laying branch, or sapling is potential food. However, while virtually scouting, you need to try and focus on destination food sources.
These destination food sources can come in a variety of ways from oak flats to near by bean fields. The trouble you may have on a large parcel of public land is picking them out from a map.
One of the easiest ways is by using a vegetation map. Being able to locate small sections of oaks within cover is a great place to start searching. Another easy place to pinpoint is 3-5 year old clear cuts and thinnings. Most of this is done by the US forestry service, and within your OnX map, you are provided a layer just for that purpose.
Aside from those two maps, it can become tedious looking for food sources on a map. This is another instance where I rely heavily on transitions and water. Typically somewhere along a water source there will be a stand of red brush or dogwood, an excellent food source for deer. Along transitions where there may be a substantial opening in the forest canopy, the light that is allowed to reach the forest floor often promotes early successional growth.
Most often, in finding destination food sources on a map, you will need to use some woodsmenship to predict some possible locations. The more time you spend in the woods observing terrain and food sources the easier these areas are to pick out on a map.
Distance, Depth, and Access
When it comes to finding public land that holds mature deer, the one constant is finding areas in which people are not willing, or unable to go. If a deer can find a place to avoid pressure from predators, while still having all the needed amenities such as food, water, and breeding opportunities, they have a good chance at growing to maturity. In order to consistently find these areas, in combination with the previous terrain features, you need to locate three things, distance, depth, and access.
Distance
The distance of a good property is just what it seems, the distance that someone would have to walk in order to reach that location. Most people on public land travel less than a mile from any road, parking area or trail. If you have the ability to get away from the crowd and get into areas that are not frequently disturbed you will find more success in locating mature bucks.
Depth
The depth of a property is most importantly defined as the depth of cover. The thicker the area and the more water you need to cross, the more secure deer will feel within an area.
Most hunters are willing to walk a good distance to get to a hunting location, but when half of that distance is a picked corn field, that property lacks depth of cover. If that corn field was instead a half mile hike through a blown down cedar swamp, followed by a river crossing and another quarter mile trek through a cattail swamp, the vast majority of hunters wouldn’t navigate the physically demanding terrain.
If you are willing to, you will find that the heavily pressured deer, no longer act pressured at all. They feel secure by the depth of cover.
Access
Access opportunities is one of the easiest to spot from an aerial photo. Parking lots, walking paths, and ORV trails give incredibly easy access to everyone. Avoid these areas the best you can. While there are always exceptions to the rule, the easier it is for someone to access a piece of property the more likely they will.
Even when you can find areas that are off the beaten path, the more points of access a property has, the more inviting it may seem to others.
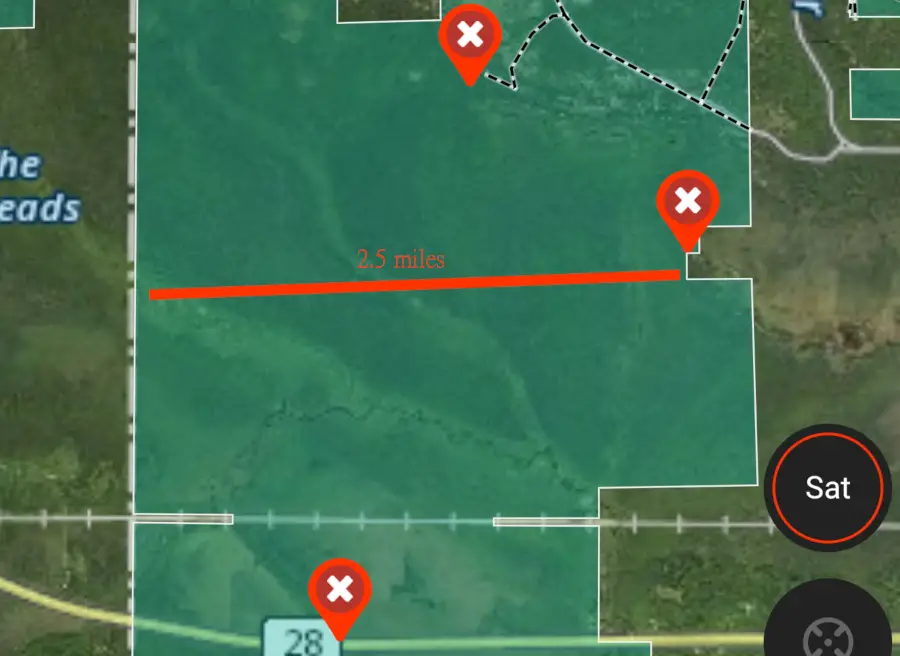
This piece of public land that we are looking over has three main access points: the trail system to the north, a dead end two track to the east and the highway to the South. Each access point would require accessing across a body of water and the shortest distance to one side of the property to the other is over 2 miles. In this instance, this piece of property gives you the best of all worlds with limited access, distance, and depth of cover.
Mapping
Now that you have all of the available tools, and are keyed in on various transitions, food sources, and are aware of the distance, depth and access a piece of property offers, you can begin to map out potential locations for trail camera sets.
Take a look back at each of the way points, transitions and water sources you have taken notice of. These are great places to begin to start inserting potential trail camera locations on your map. Liter your map with every location that you personally have found to be of interest. The more points you create, the more efficient you will be able to be once you finally put boots on the ground.
Using Trail Cameras
All of the virtual scouting you have done up to this point is simply familiarizing yourself with the landscape and giving you ideas of where you should focus on. The more time you spend looking at these areas the better you will get at picking them apart.
The use of trail cameras, however is designed to allow you to spend less time figuring out an area, and more time doing the things you need to focus on in your daily life. With that said, know that I always hang my trail camera sets the first time I am able to get out and walk a property. We broke them down here as two separate activities, but in order to save time, they are done simultaneously.
Boots On the Ground
Virtual scouting is where all the work is done preparing for a new property, but physically putting boots on the ground is where you will learn the most. All of the maps and trail camera data gives you points on a map, a starting place, but does not give you everything you need to know. At this point that can only be learnt from being there.
Once you take a day to really become comfortable with the property and the terrain, then all of the virtual scouting and in the end the trail camera data will place the pieces together.
Walking Transitions
This is where the OnX mapping system really comes in handy. You have all of the way points, transition lines, and places of interest already loaded onto your phone. Using your GPS make sure you get eyes on each and every location you marked.
If the spot you originally found does not prove to be as fruitful as you had hoped simply delete it. If you find something else that catches your eye, like a heavy used trail, a rub line or an old apple tree, be sure to investigate it, and mark it on your map.
All of the marks you make, or even the ones you delete, in the end will be a piece to a bigger puzzle.
Setting Your Trail Cameras
As you are putting boots to the ground, you should be hanging trail cameras in areas that are of the most interest. The goal is to be on the property just the one time, to scout, hang trail cameras, and to become familiar with the area.
Putting Out A String
Putting out a string of trail cameras is an effective strategy that hit me over the head while watching Discovery Channel’s “Deadliest Catch.” For those of you who are not familiar with the show, it is a documentary on Alaskan crab fishermen who fight the weather and time to catch their quota of crab on the Bering Sea.
What always puzzled me was how could a 100′ boat go out onto a 770,000 square mile body of water and pinpoint exactly where the crabs are. Aside from the obvious skill and knowledge that they have learned over many years, they key in on areas by placing a string of pots (traps) along a terrain feature that they suspect could hold crab. They are not looking to fill their boat on the first string, although it is nice when they do. What they are trying to do is gauge the area and the direction the crab are moving, in order to get ahead of them.
Essential, this is the exact same thing that we need to do with trail cameras. Randomly placing trail cameras all over a piece of property might not be the best method. You might get a nice buck on trail camera, but the point of finding public land that hold mature deer is to get a gauge and direction the deer are moving, in order to get ahead of them.
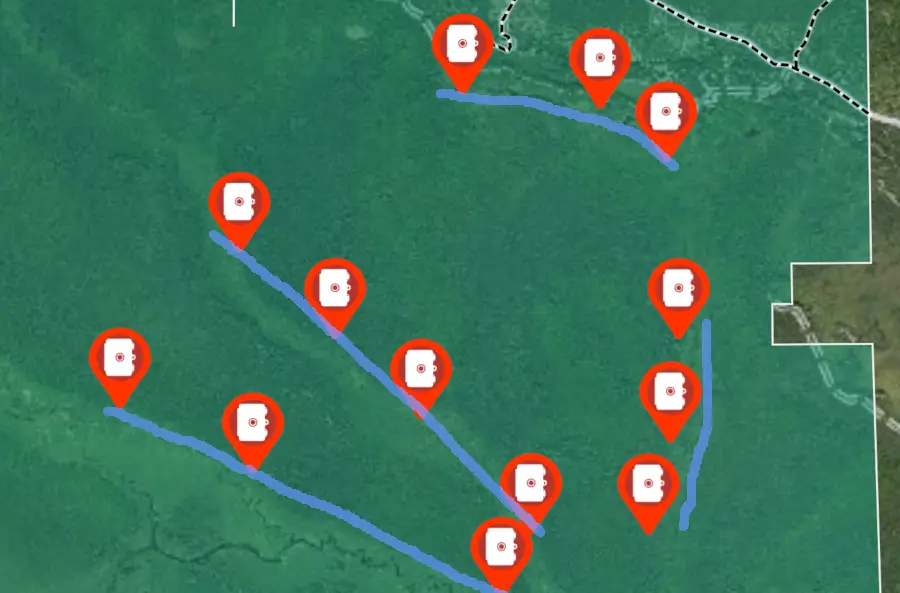
I find creeks to be one of the best ways to set a string of cameras. When walking along a creek bed, that is 2 miles long, you are likely to find multiple locations in which the deer routinely cross. If there is 10 crossing locations in that 2 mile stretch that really proves to be heavily used, placing 10 cameras will give you an incredible amount of intelligence to the type of deer that are in the area. You might not get every buck on camera, but you will get a large sample.
Other places that are great for running trail camera strings are along swamp edges, habitat transitions, and clear cuts. These areas will give you high volume of traffic, and the more traffic the more understanding you will have about the quality of deer in the area.
Finally, if you do happen to come across an isolated traffic source like a community scrape, a lone apple tree, or even a rub line, feel free to place a camera there. The more information your trail cameras can pick up the better, but focusing on long lines of movement will in the end give you a better idea of the quality of deer in an area.
Spot Check
The other aspect of setting out a prospect string, is that on “Deadliest Catch,” they do not immediately check every trap. There is a “soaking” period in which they need to allow the traps to sit in order to get the most crabs. They do however spot check their traps, meaning they will periodically check a few traps in the string to make sure they are in the right area.
I use this method as well. I will located just a couple of cameras I can get into with very little disturbance and check those cameras. This gives me an idea of whether or not I am on the right path, or am completely wasting my time.
Importance of Historical Data
This may bother a few people, but the truth is that very rarely does a trail camera help you harvest a mature buck that year. In fact, the historical data that you can get from a trail camera, will help you find those locations that are excellent for years to come.
So, be patient, and allow your new trail camera strategy to work for you. And check out the 2nd part of our series on Trail cameras on public land, where we take the historical data and backtrack bucks to those locations that will bring you closer to success.