
Hanging a trail camera in the perfect location can be an art form. Taking the time to scout, finding the perfect location, setting the camera to the best settings, and having the patience to allow the camera to do its job. But where is the best locations to hang a trail camera to begin with?
The easiest explanation is where the deer are. But if you are exploring a new property, one that is hard to pin down the exact movements of deer, that piece of advice seems way too broad. Instead, we explored 8 locations that are sure fire spots to give you the most intel on your trail cameras.
#1 Creek Crossings
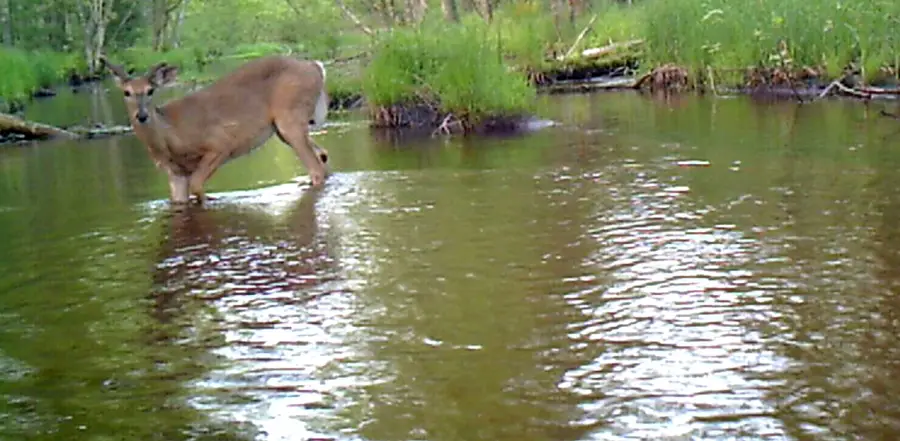
Creek crossings are one of the best locations to get a large sample of deer from any given property. The reason is simple, creeks, and the surrounding terrain naturally funnel deer to specific places to cross. Similar to people, deer naturally do not want to scale a steep hill to get to water, nor do they want to have to wade across deep water. Of course they have the ability to, but in their most natural settings they tend to take the path of least resistance.
For humans, a creek, stream or river might be a natural barrier, but for deer, they seemingly have no issues crossing water. A quick stroll along a creek bed, and the signs of deep historical runways that cross the creek will become obvious. Shallow water, easy to access terrain, and of course tracks in the muddy banks are all good indications of a well used crossing.
Hanging Your Trail Camera
Once finding the best crossing location, you have two options of where to place your camera: over the creek, or along the bank before or after they cross the creek.
Placing your camera over the creek is the harder option as it requires a good vantage point of where they will cross. A tree that is overhanging the bank or even the use of a post mount are good options to place the camera. These choices however are not always widely available.
The other option is to hang the camera just off the creek and get photos as they come to and from the water. This tends to provide more opportunities in where you can place the camera.
Settings To Use
Sometimes the settings that you choose to use on your camera can make or break the amount of information you get, but at a creek crossing, there is very few mistakes you can make. I personally, whenever possible, like to use video mode around water. Videos, not only give you a cool experience of watching the deer as they cross the creek, it also gives you a better understanding of how they cross.
Typically, when a deer comes to a water source, they slow down and look across the creek to assure that it is safe on the other side. This slows down the entire process of crossing, and could take a family of deer a few minutes for them all to cross. This is why video mode is my preference. It gives you a longer look at all of the deer that are crossing, and the slower trigger speed that you get when using video, doesn’t have an affect on capturing them.
#2 Field Edges
Nothing congregates deer in the summer like a good field of beans, alfalfa, or clover. It is a destination food source that almost every deer in the area will at some point during the summer visit. Bucks need high concentration of protein to grow their antlers, and does need lush greens to rebound from pregnancy, making these fields one of the best locations to survey an area.
Hanging Your Camera
One of the biggest obstacles of hanging a trail camera over an open field is the vast amount of space you may feel like you need to cover. The truth is however, the majority of the deer that congregate in the field will enter and exist from only a few specific locations, making your placement actually pretty easy to locate.
Before entering into a field deer tend to have what is known as staging areas. These areas are places where deer will congregate together while they assess the security of the field. The sign tends to be very pronounced with browsed undergrowth, plenty of droppings and tracks, as well as heavy runways heading into the field. Setting your camera along the edge of field where these runways enter is a great place to start.
Another consideration you will want to address is the direction you are going to hang the camera. Never place a camera facing directly East or West. When the sun rises or sets, there will be a direct affect the heat from the sun will have on the PIR sensor of your trail camera.
The combination of Infrared heat along with movement is what triggers your camera. When the sun directly hits the camera’s PIR sensor it creates IR heat, and movement of objects such as grass or leaves will increase the amount of false triggers your camera will have. For more information about what causes false triggers you can check out our resource on how to avoid false triggers.
Settings To Use
On field edges there are only two settings I use: basic motion activation, and time lapse mode. On newer cameras you have the ability to set your trail camera to time-lapse mode while still using the motion activation, however not every trail camera has this option. Here is a quick break down of the two options:
Time Lapse
When running a camera in time lapse mode, you have the ability to set your camera to take pictures at any given time. Typically over a field you would want to set this time up for about a half hour before dark, and for a half hour after sunrise.
You will also have the ability to set the frequency of how often you will want to take photos. One photo a minute seems to do a pretty good job in capturing the majority of the activity. It is a good place to start, and you can adjust it from there to get the best results for your area.
The advantages to using time lapse mode over traditional motion activation is that you can place your camera in an area where you can look over the entire field. Deer will not have to get close to your camera in order to get photos of them.
The disadvantages however is that you can only take photos during daylight times. Because of the preset times, the camera does not activate the exposure tables within the firmware of the camera, and thus will not activate the flash of the camera.
Motion Activation
The motion activation of the trail camera, is what the majority of users are use to dealing with. When a deer walks by the camera, it activates the PIR sensor initiating the trail camera to trigger. One field edges where deer will constantly browse and move very slowly, the best practice is to use a low photo burst, with a longer delay. This in the end will allow you to take photos of almost every deer that walks in front of the camera, but will eliminate filling up your SD card will hundreds of the same doe and fawn browsing directly in front of your camera.
The biggest advantage of using motion activation on a field edge is that you can still capture deer that enter the field after dark. Often times, the biggest bucks on the property will wait until the cover of darkness to enter a field.
The only disadvantage you will find is that your camera will only be able to take photos of deer directly in the detection zone of your camera. If a deer enters and exits into the field from the other side, you will likely never even know he was there.
#3 Logging Roads and Two Tracks
As most of you already know, deer tend to take the paths of least resistance. Because of that, logging roads and two tracks are a place to funnel deer past your trail camera. Even though these are generally made to be used by people, deer have adapted to take advantage of these areas for their own personal travels and browse.
Hanging Your Camera
Whether its using the trail for travel, or simply crossing the two track to go from bedding to a food source, deer are incredibly easy to pattern along these roads. You are going to want to set your camera up in an area where you can look down the two track as far as possible. There is no trick to hanging these cameras other than you want to use the camera that has the longest detection range you can afford.
No matter where you place the camera, it is inevitable that you will miss some deer just due to the vastness of these trails. Find a few good deer trails that cross the two track in close proximity, and place your camera there. In the end, if you are not finding the deer you are looking for, you can always move it to another deer crossing. These setups are all about your ability to adjust based on the intel you receive.
Settings to Use
When setting up your camera along a two track, the best, and really the only option you have is to set your camera to the highest photo burst count you can, and the shortest delay that is available. The reason for this is that when a deer crosses a road, sometimes they stop and browse, but often they will just pass right through. By using regular photo modes, you can maximize the trigger speed of your camera and the more pictures you are able to get in a short amount of time, the more satisfied you will be with the end results.
#4 Marsh Edges
Marsh edges are hands down my favorite locations to set up trail cameras. Deer go into the marshes during the day to bed, and come out only at night to feed. What I like about these locations the most is that if a buck is using a specific bed in a marsh, there is no where else you could place a camera that guarantees you will get a photo.
Hanging Your Camera
Finding these locations are extremely simple as well. Looking at satellite imagery from google earth, you can see trails that the deer use in the marsh to get from bedding to high ground. Once you find a cluster of trees where you are sure they are most likely bedding, you can follow the trails from bedding to high ground, and set your camera there. It really is that simple.
One thing that I do recommend is that when setting a trail camera along these marsh edges, make sure that you hang the trail camera up higher and point it down. You know where the deer are coming and going from, so there is no risk of missing a photo, but deer are very cautious of their bedding area, and even the slightest interruption to their normal surroundings, like a random camera pointing at their face, can cause them to move out of that bedding area.
Settings to Use
In these setups, I really like using video mode on my trail camera. Coming out of a secured bedding area, bucks typically move very cautiously, checking their surroundings and taking the time to browse. The slower trigger speed you will get with video mode will not hinder your opportunities to capture these deer.
Video mode also gives you the ability to see how the deer moves coming out of the marsh. It will give you a better understanding of the personality this deer has, and how long it takes for a deer to leave its bedding area, all vital information for a hunter to have.
#5 Clear Cuts
Clear cuts, places where older trees have been harvested, and early successional growth has appeared are great place to find congregations of deer during the early spring through the late fall, and sometimes even into the winter. The young growth starting at about two years of age, create not only exceptional low hanging feeding opportunities, but provide exceptional cover for bedding as well.
If you use OnX mapping systems you can easily locate these areas by turning on the timber cuts filter. This not only gives you the ability to see where clear cuts have occured but gives you the year in which the timber was harvested, allowing you to determine the amount of growth that early successional forage might be at.
Hanging Your Camera
Hanging your camera around clear cuts, can prove to be a game of resilience. Due to the nature of the thick vegetation, there are very few opportunities to hang your camera within the clear cut, forcing you to find areas where deer enter and exit the area.
Similar to placing your camera around a field edge, you are going to have to determine where the majority of the deer enter and exit the cut. Unlike a field however, deer are not able to travel anywhere in the dense area, making heavily used trails the ticket.
With a quick walk around a clear cut, you might find as many as a few dozen trails that lead to and from these areas. I start by picking locations for your camera that can cover multiple deer trails. If there is little to no pictures from this location, its time to move the camera to the next spot. Deer will use these areas frequently and if there is little activity, its not because they are not there, it is because the camera is not in the best location.
Settings to Use
Because of the nature of clear cuts, each deer, on each day may act differently when entering these areas. One day they might simply walk right in, the next day they might stop and browse on the edge before entering.
With this in mind, the settings on your camera are very simple: use photo mode with with a simple 3 to 4 photo burst and a basic 5 or 10 second delay. These settings will give you all the information that you will need in order to collect the data, and their movement patterns.
#6 Scrapes
Scrapes are the epicenter for deer communication. Scrape locations however, can sometimes become confusing, especially around the rut, when scrapes open up nearly everywhere. It is important to find the community scrapes that all deer use rather than territory scrapes and rut scrapes, that tend to be used only a number of times during specific times of the year.
The key to finding a quality scrape to hang your trail camera on is by making sure it has three things:
- Size- Not every scrape has to be the size of a car hood, but the size of the scrape is often in direct correlation to the amount it is used. The larger it is, the likelihood of more deer using it increases.
- Licking Branch- Having a branch that overhangs a large scrape is almost a necessity for community scrapes. These branches, also known as licking branches, are where deer rub the two scent glands that are located on their head: Preorbital gland and the forehead gland. Both glands are used in leaving a deer’s scent, and is used by other deer that visit the scrape to identify them.
- Good Location– It might seem that any place there is a scrape is a good location, but those areas that are high in traffic, will often get the most visitors. Around field edges and food sources, between bedding areas and along water sources are all areas that not only will deer congregate, but are more likely to continuously visit a scrape.
Hanging Your Camera
There is an art to hanging a trail camera around scrapes. Despite your desires to hang your camera on the same tree that provides the licking branch it is important to keep the camera out of view. Usually mounting your camera to a tree that is on the side of the scrape 10-15 yards away keeps the deer from directly noticing it.
Another aspect in keeping the deer from becoming spooked by a camera on a scrape is the ability to find a tree that is wider than the camera. It allows the camera to blend in easier with the surroundings, giving the deer less reason to be cautious about using a particular scrape.
As far as the height of the camera, it comes down to your personal preference. If you hang the camera at around 8′ high and angle it directly toward the scrape, you can tend to get better angles to really dissect a deer’s antlers. However, if you were to place your camera at body height of the deer, you can often catch the deer moving into the scrape, giving you a better opportunity to understand which direction they are coming from. I have used both methods of hanging, and both work great for the information you are trying to decipher.
Settings to Use
100% of the time I use video mode on scrapes. The reason for this is simple, deer that visit a scrape come to the scrape, mark the scrape for a minute at most, and then walk away. There is no better opportunity to use video mode than these areas. You know exactly where the deer is going, so you can pinpoint exactly where the camera is pointing, and then you can capture the entire interaction with the scrape.
I always use 1080p Full HD video capable trail cameras on these locations. The higher quality resolution allows you to freeze any frame and look at details. If you want a photo of a certain deer, you can always extract a photo from the video, and with 1080p the photo will be of high quality.
Aside from the video resolution, I set the video length to 2 minutes. You will likely find that this length is a bit long, but in these situations I would rather have too much video length than not enough.
The other option that I have found really good success with is the new Smart IR feature by Browning trail cameras. With this feature the camera records video as long as there is movement in the frame. It uses the same technology that triggers the camera, and uses it to start and stop video mode. It really is a nice feature for saving space on an SD card, and time watching the tail end of videos with nothing in it.
#7 Rub Clusters
Something that I have been experimenting with, and have found a lot of success with is locating rub clusters. To be clear, rub clusters are extremely different than a rub line. Rub lines are made specifically by one buck, to mark territory, bedding areas, or to simply take out aggression.
Rub clusters on the other hand are small groups of sapling trees, that are isolated pockets in swamps, on field edges or on the edge of thickets, that are visited by multiple deer. Once you stumble upon one, you will instantly know what you are looking at, as there are upwards of hundreds of rubs in as small as a one acre location.
For what ever reason, these small isolated areas attract almost all of the bucks in the area at least once throughout the season. In 2019 at one of my public land hunting locations in Northern Michigan, I was able to capture over 75 different bucks over the 3 month hunting season, that visited just one of these rub clusters . While not all of the bucks were mature, and most of these photos appeared at night, it gave me an incredible stock pile of photos that allowed me to see what was hanging around the area.
Hanging Your Camera
Hanging your trail camera around these locations is very simple, just find the spot that gives you the best vantage of the largest portion of the cluster. This typically would mean that you are going to want to hang the camera at body height, and keep the camera far enough away so that you have the ability to see a wider view. Other than that there is nothing to it.
Settings To Use
To be honest hanging trail cameras around these small rub clusters is still in an experimental stage for me, but I have found great results thus far. I have yet to use video mode on any trail camera in these locations, even though I truly can see where, like a scrape, having video would be a great asset. What makes me hesitate on this however is the pure volume of deer that come through these areas. This amount of volume will not only fill the SD card at an incredibly fast rate, but will also dissipate the battery life.
To date, what I have found to be the most successful is to simply use a higher burst count of 5-6 photos, with a regular 10 second delay. This does give you enough photos to get a good angle, and with the faster trigger speed you get with basic photograph mode, you do not miss those deer who are just passing through.
#8 Isolate Food Sources
Isolated food sources are much different than destination food sources like food plots, agricultural fields and even oak flats, but are rather small food attractants such as an isolated apple tree, an oak tree on a marsh island and where it is legal, bait piles or mineral licks.
These areas attract deer to feed throughout the day, as they can often be located within security cover, allowing deer to feel comfortable to feed without the cover of darkness. These isolated food sources probably will not attract every deer within a mile, but will attract deer that bed close, giving you a good idea of what deer are in the immediate area.
Hanging Your Camera
Around isolated food sources, much like scrapes, it is easy to pinpoint a specific spot a deer will be, thus if you prefer to hang your camera higher in the tree and angle it down, you can do so. Otherwise, hanging your trail camera at body height, just 20-30 feet from the food source will get you all the photos you need.
Settings To Use
At isolated food sources, deer will tend to linger for a good amount of time. There is security in these places, so they will feed until they are satisfied, then move on. Because of this, running video mode will quickly fill up your SD card, the same with running high photo burst counts.
Due to their behavior in these situations I recommend setting your camera to a low burst count like 1-2 photos with a longer 30 second delay. This gives you the opportunity to get a few photos to see the deer, and likely additional follow up photos after the 30 second delay. This keeps you satisfied with the amount of photos you will get from these locations, as well as keeping you from flipping through hundreds of photos of a single doe family group.