
Whether you are brand new to cellular trail cameras, or you have ran hundreds of them, you likely need to refresh on the items that you must have in order to make setting up simple and easy.
While to some the use of a cellular trail camera seems daunting, trust me, it is much more simple than you perceive it to be. So simple, that my 72 year old father in law, was able to follow simple instructions and was able to get his cellular trail camera up and running within minutes, without any help.
In setting up a cellular trail camera you need 5 basic items (and 1 bonus item):
- Purchase Batteries and an external Power Source (recommended)
- Purchase New SD Cards
- Make Sure You Have a Sim Card
- Download the Mobile App
- Purchase a Data Plan
- (Bonus) Confirm You Have Cellular signal
With these six items already in your hands, setting up your cellular trail camera will be quick and easy. Let’s dive into each item, assuring that you understand exactly what you need and why you would want it.
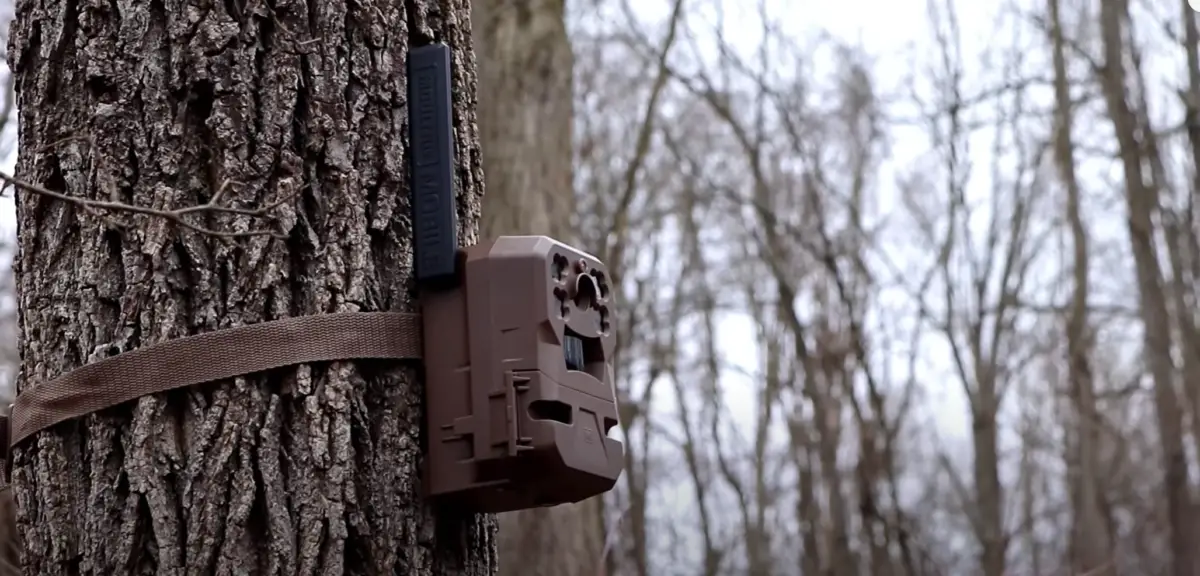
1. Purchase Batteries and an External Power Source (Recommended)

Its not ground breaking news that you are going to need a power source to make your trail camera work. In fact, using standard batteries as the power source has been around since trail cameras were introduced in the late 1980’s.
However, the recommendation of which batteries to use has evolved over time. We conducted a very thorough and time consuming project to test, and analyze the longevity of batteries in multiple different trail cameras, in different weather conditions.
You can read our entire battery test here, but the ending results were that Energizer lithium ion batteries out performed, and outlasted all other batteries on the market. They also, despite being one of the more expensive options up front, were the most economical options throughout the life of the battery.
In general, most cellular trail cameras will take 12 AA batteries. The life span of the batteries depends on many settings that you can adjust, such as frequency of uploads, burst mode, and delay settings. Other factors that you can not control are the cellular signal strength and the amount of times the camera is triggered.
The important thing to take away from this is you are going to need at least 12 AA batteries to get you started.
External Power Source
One of the biggest shocks I had when I first began to run cellular trail cameras was that the battery life is typically about 1/3 of the life you would normally get from standard trail cameras. With this being the case, I recommend looking into the use of an external power source to go along with the batteries
External power sources for trail cameras can include
- Solar panels
- External battery packs
- 12 Volt battery boxes (sometimes come with an additional solar panel
These extra power sources can easily be plugged into your cellular trail camera, giving your camera extended battery life. The true downside to using these, is that they are not easily concealed, making them more visible to not only game, but thieves as well.
2. Purchase New SD Cards
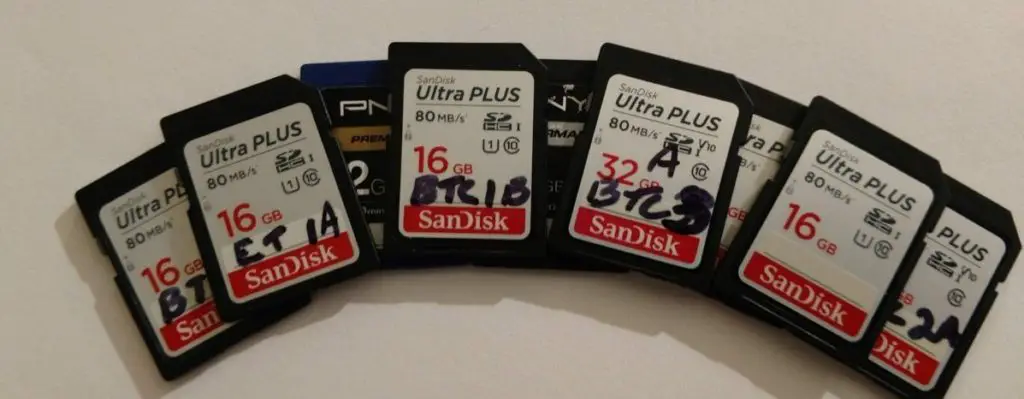
As always, we recommend that with the purchase of a new trail camera you purchase 2 new SD cards to go along with it. The first SD card is obviously used inside the trail camera, and the second is used for when you tend to your camera, you can quickly and easily switch out the SD card.
With Cellular trail cameras, you do not need to buy a large SD card, like a 64GB. Simple 16 GB SD cards should do the trick. The reason for this is because you will be able to monitor and manage the photos on the SD, from the cameras app. (More on the app later)
I recommend the SD card being a class 10 as well. The class 10 cards write onto the card faster than lower rated cards, allowing your camera to produce and write better quality images and video at a quicker pace.
The only two SD cards that I recommend using are:
When it comes to SD cards, buy reputable brand names. I have had too many problems with SD cards that were off brand cards, trying to save a few dollars. You get what you pay for, and in this case, what you pay for will alleviate any headaches down the road.
3. Make Sure You Have a Sim Card
A SIM (subscriber identity module) card is a Small memory chip that stores information about you as a cellular user. On the card there is a 7-digit number that distinguishes you from other cellular users. The number identifies: you, your cellular service and the country in which you are using it in.
In order for you to use a cellular trail camera, your trail camera must have a SIM card. Lucky for most of us, the well known cellular trail camera manufacturers (Browning, Stealth, Exodus, Moultrie, Spypoint, Spartan, etc) provide one with your cellular trail camera. It is already installed and ready to use.
For those who are using a white-label trail camera (one that is manufactured by a different company, then sells the rights to that camera to a 3rd party seller) most often you will need to find your own SIM card. You can obtain a SIM card from a cellular provider such as Verizon or AT&T, but it just requires that extra step in the process.
My advice is to stick to the brand name cameras, especially at first, as you learn the ropes of cellular trail cameras.
4. Download the Mobile App
It is important that you download the mobile app for your trail camera. Every trail camera manufacturer has their own mobile app. You can find the mobile app on the Google play or in the Apple Store. These apps are 100% free to download.
These apps are where you will do almost everything for your cellular trail camera. You can set photo or video quantities, upload frequencies, change various features on your camera, and in most cases now you can purchase and manage your data plans.
The most important feature of these apps is that this is where you will receive all of your photos. Through the app you can manage all of the SD card images, upload HD photos, and receive notifications of images coming in.
Just go into your app store and type in the manufacturer and the term “cellular app.” This will pull up the application you need to download.
Note that most manufacturers will have a different name than just cellular app. For instance Browning’s app is called “Strike Force Wireless”, Stealth Cam is called the “Command Pro”, and Moultrie is called “Moultrie Mobile.”
5. Purchase a Data Plan
Purchasing of a data plan is where most people begin to get hung up with cellular trail cameras. The process of finding the right data plan that is right for you, and going through with making the purchase is what most people dread.
Trust me when I tell you it is simple. It is so simple, that you really could set all of this up in less than 5 minutes. If you purchase a camera from a reputable brand, it will take even less time.
First you might want to check out our article that breaks down each and every cellular trail camera plan on the market. It is simple to read through, and covers all of the major trail camera manufacturers, giving you price and data plans. You can view that article here.
Once you have done that, simply go to the manufacturer’s website, (or even the mobile app) and click on their link for cellular plans. They will ask you a few simple questions, like the model number of the camera, and an ID number that they provide you with the camera. Then you simply add in your purchasing information, and are done.
The reason why it is so simple with these reputable trail camera companies is that they have already purchased all of the data from the cellular company (verizon, AT&T, etc..) and then bundle the packages to you. They do all the heavy lifting, and you simply use their service.
White Label Cellular Trail Cameras
For those who are buying white label trail cameras, most often from Amazon, you will have many more steps that you have to deal with. Instead of just going to the trail camera’s website, you have to set up all of your plans with the Cellular company directly. This can become a bit more expensive, but if you get in touch with a knowledgeable customer service agent, it can be relatively painless.
One last note of advice I often give is that when you are choosing your Cellular package, whether it be from the manufacturer or the cellular provider, start small. Choose a smaller package than you think you might need.
I often found that I over estimate the amount of pictures that I get by almost double. The reason for this is simply that not every photo in a burst set is sent to you. If you set your camera is set up to take 4 photo bursts, you will only receive one of those photos.
6. (Bonus) Confirm You Have Cellular signal
The final thing that you will need, is actually a bonus item, that you don’t actually have to purchase. This is simply to make sure where you are planning on putting your cellular trail camera, you have cellular service. The easiest way to do this, before you even purchase your camera, is to take your cell phone and walk around the area you wish to put the camera.
As you walk around make sure that you pay attention to the amount of signal that your phone has. This is a very good indication of the amount of cell service your camera will receive.
In order for your cellular camera to work properly, and upload photos to your mobile app, it needs good service. It is the most imperative aspect of the entire operation
Conclusion
There it is, the 5 essential items you need to set up a cellular trail camera. Not one aspect should take more than a couple minutes. The entire process always seems more daunting than it actually is. Just make sure you have these basic items, follow the setup instructions from the camera manufacturer and within 10 minutes you should be up and running.