
Cellular trail cameras are meant to be a fun tool, but there is something about not receiving photos that can drive you up a wall. You are miles, if not states away from your cellular trail camera, and you get a dreaded feeling that things are not working correctly.
Maybe you have been receiving photos at a regular clip, and all of a sudden without warning the photos have dried up. Or it is possible that you have yet to receive a photo at all. Either scenario, can send you into an instant frustration with modern technology.
Take a deep breathe. We can figure this out together, with this simple checklist of steps to trouble shoot your lack of cellular photos, we can get to the root cause and find a way to fix it.
Check Your Camera’s Last Connection Date
Going into your Cellular trail camera app, the very first thing you should check is the date and time your camera last connected to the app. This will tell you a few things that are very important moving forward.
First of all, it will let us know if your trail camera is even connecting to the app. If the camera has not connected in the past few days, this likely is pointing to a few potential issues:
- There is a lack of Battery Power
- You have poor cellular connection
- Your cellular data plan is not active
- Your Data plan has been exceeded
- The SD card or the SIM card on the camera is not working properly
- The upload frequency or your settings are hindering transmission
If your trail camera has connected to the app in the last few days, the list of potential issues becomes much smaller, and the fixes are much easier. If it has connected, the most important things to check are very simple:
- Has there been any photos taken by your camera?
- Does your mobile device have adequate service?
- Does the camera need a firmware update?
In most cases, these are the nine common problems with cellular trail cameras not sending photos. Lets take a more detailed look at each one and how you can correct them.
1. Check to Ensure There is Adequate Battery Power
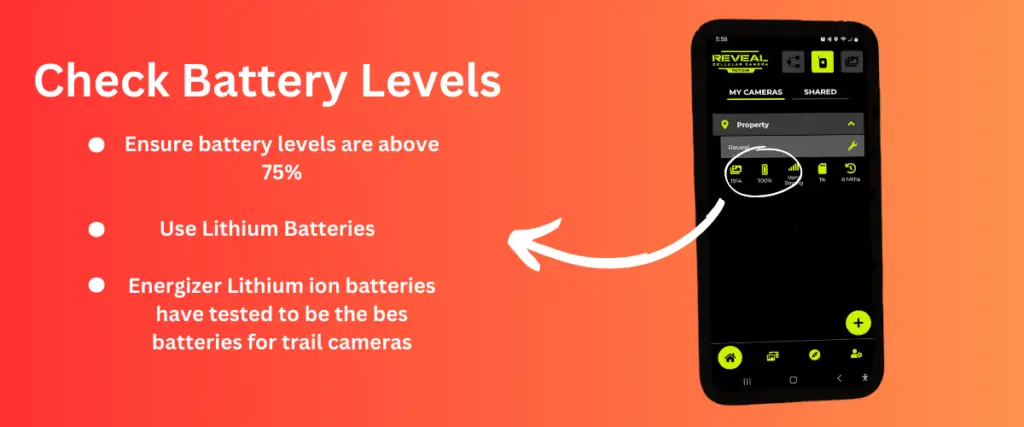
This might seem a little too obvious, but your cellular trail camera needs to have battery power. One of the things that the average consumer might not know is that while the camera doesn’t need a full battery to take a picture, it needs a full battery, (or least closer to it) to send the photos.
The average cellular trail camera runs off of 12 AA Batteries, resulting in around an 18v system (1.5v per battery). When you use Alkaline batteries, they slowly start to discharge and lose power. A camera that was once receiving 18v from 12 batteries is continuously is losing power as it is being used.
Once the battery circuit is producing below 12v, (the needed amount to successfully run a trail camera) certain aspects of the camera no longer work effectively. The trigger speed slows down, the flash distance isn’t as bright, and its possible the camera no longer has the power capacity to send photos via cellular service.
This is why I recommend using Energizer Lithium ion batteries. We had done a complete test on dozens of batteries on the market and found that the Energizer Lithium’s last the longest, and are the best economically for trail cameras.
Lithium batteries in general, do not discharge power the same way that an alkaline battery does. While Alkaline batteries will slowly drain, the Lithium’s keep producing the full 1.5v of output until they are out of battery completely. Meaning they will work at full capacity until they need to be replaced.
So, check the battery on your trail camera. You can do this either at the camera, or through your mobile app. You are able to receive the same data about the battery power from both locations.
2. Make Sure You Have Good Cellular Signal
Having a good strong cellular signal is imperative to having a cellular transaction. I know, it might seem like common sense, but it is important to double check anyway.
Just like with your cellular phone, you can be standing in one location, and all of a sudden you lose signal. The same can and does happen to cellular trail cameras as well. Maybe cloud cover, or lack of cloud cover can affect the signal. It is possible on a windy day, the signal gets distorted.

Just like with checking your battery power, you can find the cellular signal on the mobile app. Often it will give you a percentage of signal, or a bar similar to your phone. Double check to make sure that the signal is over 50% to rule out this possible problem.
One more thing that you might want to take a close look at is the type of signal you are receiving. If your trail camera is suited for 4G but in the area your camera is in, you are only getting 3G, your camera will not be able to transmit photos, despite the amount of signal you are getting. This is one important thing to keep an eye on.
3. Is Your Data Plan Active?
Now, that we have eliminated some of the more simple to fix problems, we begin to get into the meat of some of the more complicated problems. Simply ask yourself: is the data plan active? and Did you get a new debit or credit card?
This one, in fact has tripped me up before. My debit card expired, I had received a new one, and despite the fact that I changed all of my card information with various subscriptions and auto pay renewals, I did not remember to change the card information for my cellular trail camera plan. It is a simple fix, but was definitely not the first thing that came to my mind with transmission problems.
Also, check to make sure that your data plan did not end. It is possible you purchased a 3 month package and you are on month 4, and just did not renew your plan. Sometimes Cellular camera companies change their data and pricing structures and are waiting on you to choose a new plan before resuming your service.
Dive into your data plan, check your debit card, and look through all of that information through the mobile app or in your online account. Check through your bank statements to ensure you have made your latest monthly payments.
4. Ensure Your Data Limit is Not Exceeded
Another possible problem is that you have exceeded your monthly allotted limit. While this has never been a problem with me personally (I always buy way more than I need, and pay for it too. But that is a problem for another day), it does happen.
When you first set up your trail camera plan, you might have purchased a plan that only allows for a a few hundred photos a month. Or in the case of a Spypoint trail camera, you are taking advantage of their free services that only allots for 100 hundred photos a month. You may be surprised how quickly your run through your monthly quota. It can go really fast, especially when running multiple cameras on the same account.

In most cases you can find the amount of photos you have had sent on your mobile app. Check and compare that number to the amount of photos you are allotted with the plan you chose. If this is a problem, you can often set a notification warning when you are closing in on your limit. Setting this notification can keep you from having this problem reoccurring in the future.
5. Check To Make Sure Your SD Card and Sim Card Are Working Properly
When it comes to trail cameras, whether it be cellular or traditional trail cameras, the cards are often the biggest, most consistent problem you deal with. Lets start by looking at the SD Card first.
Checking SD Card Problems
The main issues that you often will face with SD Cards in cellular trail cameras are 1 of 3 issues
- Wrong size
- Card Full
- Card is Corrupt
Each and every trail camera has a SD card capacity range. Typically it will range anywhere from 4GB-512GB. Not all cameras, however, have the same range of capacity. Check the owners manual to make sure that your camera can take the SD Card you are using.
The next possibility is that the SD card you have in your card is full. In order for a cellular trail camera to send you photos, it needs to be able to take the photo from the SD card. Reaching the capacity of a card, often happens, and if you are not monitoring your SD card properly it can sneak up on you.
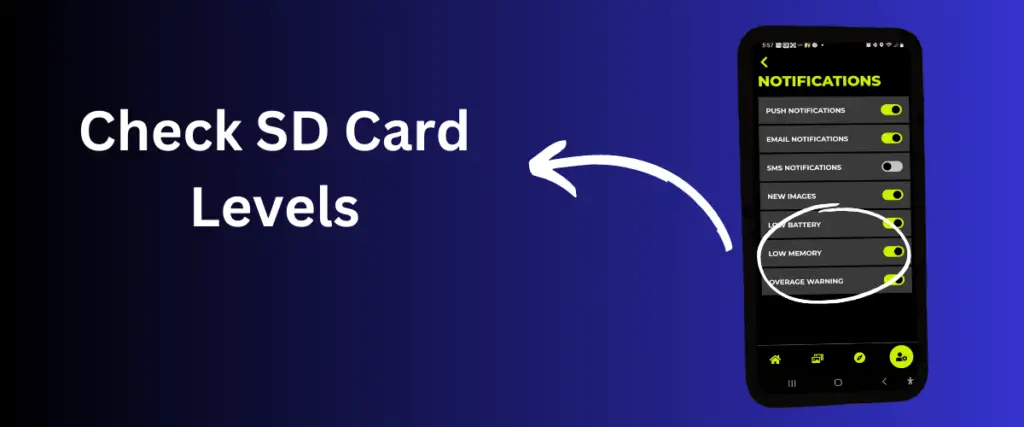
You can avoid this problem by setting your SD card notifications to alert you when your memory is getting low. You also can change a setting in your mobile app. to “loop” or “overwrite” the SD card. This will allow your camera, when the SD card is full, to write new images overtop of the oldest images stored on your camera. It is important to note that the images that are overwritten, will be gone for good, unless you download the photos ahead of time.

The final issue with SD cards is a corrupt card. Unlike the previous two, this one might take a while to figure out. The card itself might be corrupt, there might be dust or debris in the card slot, you might have the SD card lock accidentally switched. There are a ton of possibilities, which is why we have an entire article dedicated to the most common SD card problems, that is a great resource for anyone having issues with their cards.
Checking SIM Card Problems
The Subscriber Identity Module Card (SIM card) is the card that is inserted into your trail camera that communicates with your cellular service. This card card relays important information, such as your specific carrier, your unique code for your service, as well as the country of origin. The funny thing about these cards is that they do go bad, and sometimes for no reason.
In fact, as I am writing this, I am waiting on a replacement card to be sent to me for my Tactacam Reveal camera. I received a warning that no SIM card was detected in my camera. So, in order to replace it, I simply called Tactacam, sent them $5.99 plus shipping and handling, and they sent me out a new one.
While it is a bit annoying having to replace a card, it is as simple as plugging the new one back into the camera, and you are good to go.
6. Check Your Camera’s Settings and Upload Frequency.
Take a minute and check on a few things in your trail camera settings, to make sure that everything is set up correctly and is the most efficient for your camera.
Check Upload Frequency Setting
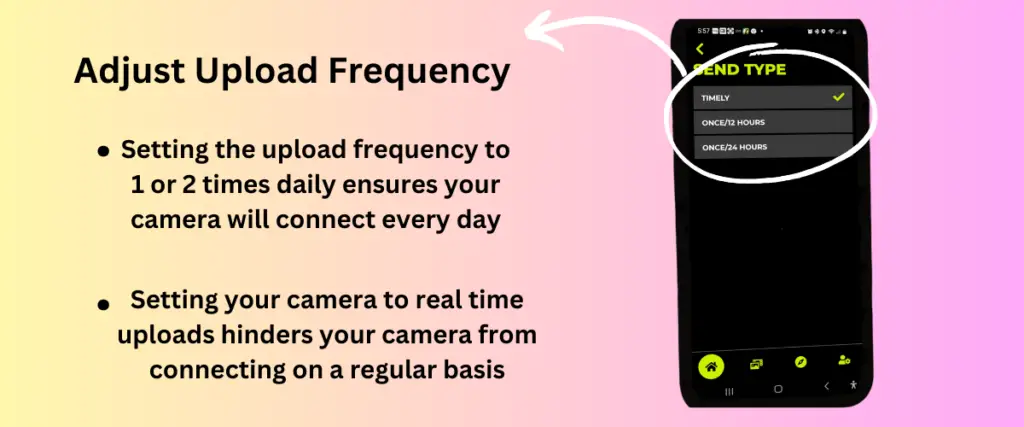
The first setting you should check is how often you are uploading your photos. Many times, especially when a cellular trail camera is new, you set your camera to upload immediately.
One of the most frustrating things to realize with running cellular trail cameras is that immediate upload frequency, is actually the worst upload frequency for your camera. While it is fun to get photos in real time, it does not connect your camera to your app with any regular consistency.
If there are no photos to upload, the camera will not connect to the app until there is a new photo. While on the reverse side of things, if you have your upload set to every 12 hours, it forces your camera to connect every 12 hours, regardless if there are photos to upload or not.
Setting your camera to a consistent upload time will provide two benefits:
- It allows your camera to connect to the app, and receive any changes you make to the settings or any updates the camera might have through the cellular provider
- It allows you to make sure that the camera is connecting, ensuring that it is working properly
It is important to note that if you have your camera set to immediate upload, and change the setting to a consistent upload, it will not make the change until the next time the camera connects to the camera. So if you are not sure if your camera is taking photos, changing the upload frequency at this point, leaves you waiting for your camera to connect to the app before it will make the change. Leaving you in a catch 22 situation.
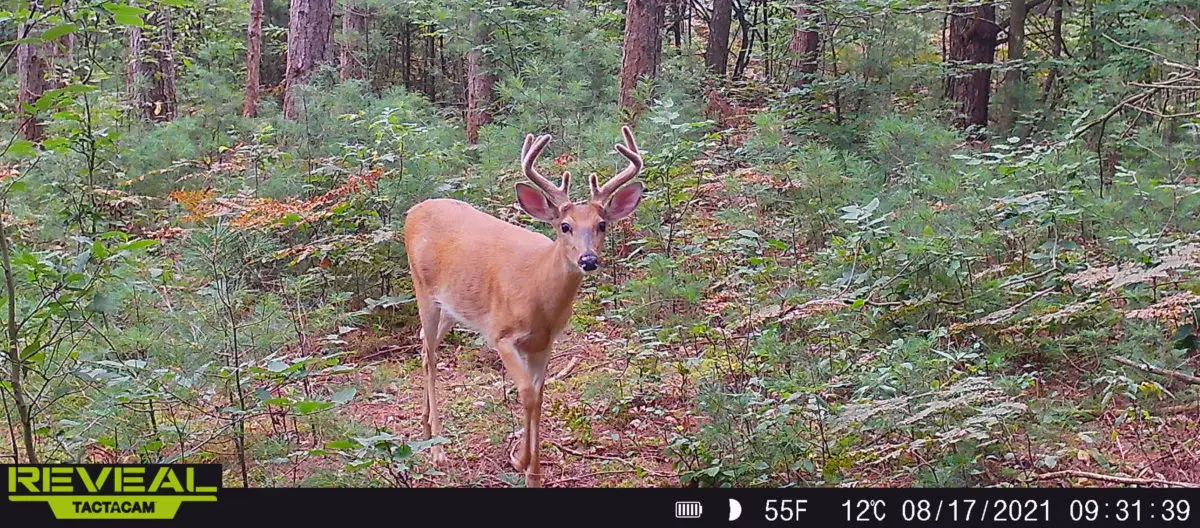
7.Ensure There is Activity Around Your Camera
Before you call your trail camera manufacturer complaining about the lack of photo uploads, and telling them that their cameras are a piece of junk, and you want a full refund on their product, make sure that you have been having activity around your camera first. As much as they like hearing from their customers, they really don’t appreciate being yelled at without due cause.
So, if your cellular camera is is within any reasonable distance of your house, drive over and spend a few minutes walking in front of the camera. See if your camera sends you any photos.
Next, check the SD card, and match the photos stored on the card, to the photos sent to you. If your camera is indeed taking photos not sending them to you, then you proceed to checking the next possible items.
Unfortunately, this is one of those situations that if your camera is in another state, and you don’t have ability to immediately get in front of the camera, it becomes a bit of waiting game until you get the opportunity.
The only other situation that you can try is if you have one of the selected few cameras that allow you to access a live view, you can try that to ensure the camera is still working.
8. Make Sure Your Mobile Device Has Good Cellular Signal
With an interaction between two cellular devices both need to have good signal. We have already checked the camera’s cellular connection, now we need to ensure that the problem is not your mobile device.
The best way to accomplish this is to simply connect to a WiFi internet. This way, you are not relying on your cellular signal to be strong, and we can quickly eliminate any possible inconsistencies. So connect to a WiFi, either at home, work, a Starbucks, or anywhere else that you can get access.
If this does not work in receiving photos from your camera, then we know for sure that the connection on your end is good, and we can eliminate that possibility.
9. Update Firmware For Your Camera
Typically the last thing that I look for is the possibility of updating the firmware on your camera. Inside your app, there will be a location where you can see the last time your trail camera updated its firmware. This typically doesn’t happen often, but if your camera was off, maybe in storage for the winter, it is possible that you missed the update.
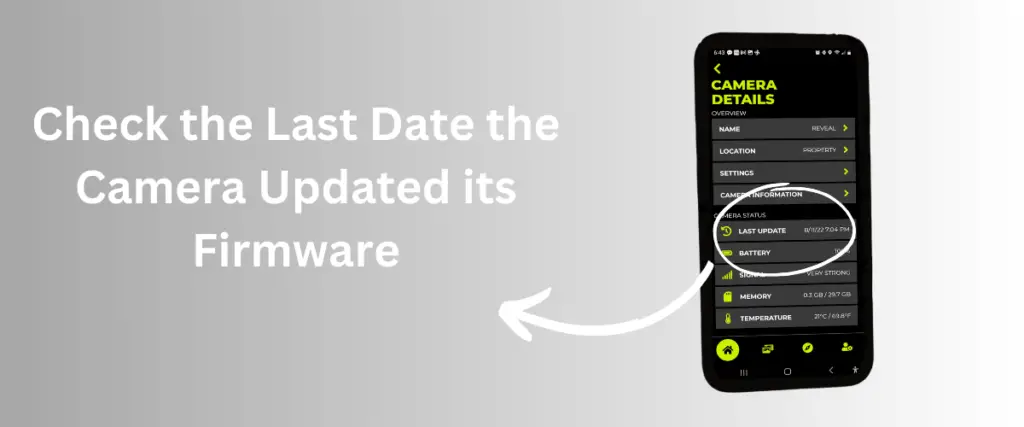
The easiest way is to check the last updated date on the camera app, and then go to the manufacturer’s website and check out the last firmware update that they released. If the dates do not matchup, you will need to update the firmware for the camera.
Luckily, unlike standard trail cameras where you have to download the update onto an SD card then transfer it to the camera, with cellular trail cameras you can do all of the updates through cellular service. Each camera manufacturer has a different way of performing these updates, so it is imperative to find that information through their website.
Conclusion
This list of the most common reasons why your cellular trail camera is not sending photos by no means is an exhaustive list. While from my personal experience of running cellular trail cameras, these are the most common, it is possible that there are some issues that are much more complex than what I have dealt with. In those circumstances, it is best to contact your camera’s manufacturer directly.
I encourage you, to call on the phone, and talk to someone directly. From my experience, even though you can get your questions answered through email, it is much more productive to find resolutions through direct person to person contact.