
We all love running trial cameras. There is nothing better than peaceful walks in the field, quiet days surrounded by nature, and the art of collecting photos and videos of how nature reacts when no one is around to see it. Those peaceful days can quickly come to a screeching halt at the hands of an SD card failure.
There is not one thing that sets me off more than ruining a quiet day in nature with technological problems. They seem contradictory in the natural scope of things, and can leave you miles from your vehicle without any idea of how to correct the problem.
SD Card problems in trail cameras most often the result of a bad connection between the card and the housing socket. Other possible issues include a corrupted card, a locked SD card and a card that is not properly formatted.
We have compiled a list of the most common reasons why a trail camera is failing to read an SD card, and how to fix it in the field. Because no peaceful walk in nature should be ruined by technology.
Common Problems SD Card Problems
SD Card Is Reading Full
This has happened to me more times than I care to admit. I switch out my SD cards, and the trail camera reads that the new card is full. Knowing that it is not full, in fact there is nothing on the card, I shut the camera off and try again, and again. All with the same results.
Corrupted Card
It is possible that the SD card is corrupted. Like all manufacturers there is no way that every single product they create is flawless. Sometime you just get a bad SD card, it is part of the process. It could also be that the card you are trying to use has previously been formatted to a different camera, and the files that previous camera created is unsupported by the new camera.
How To Fix
There is simply no fix for that particular SD card. In the field the only remedy you have is to try a new card. If a new card is yielding the same results, there is likely a phone call to the trail camera manufacturer in your future.
Poor Connection
When you look at the back side of an SD card, there are 9 contact pins that need to fit snug against the transmitting contacts within the socket of your camera’s housing. If this does not happen, the camera will not be able to read the card, and will provide errors such as card full.
How To Fix
First and foremost take a physical look at the card itself. Inspect the contact pins to make sure that there is no damage to the pins. Scratches and general wear will happen over time, especially when you are using the card frequently over a long period of time. When this happens, it is time to replace the card.
The second possible problem is that there is some sort of dirt or debris inside the camera’s SD socket. This commonly happens when your camera is in areas, such as a worked farm field, where there is more dust in the air than usual. Simply take an aerosol dust cleaner and blow into the socket. You could also just use your mouth to blow, but be careful not to allow any moisture into the socket. As we know, moisture and electronics do not mix well. A simple burst of air should dislodge any dust that is preventing a connection.
Card Says Locked
Switch in Lock Position
On every SD card there is a small switch on the side of the card that has the ability to lock the card. This switch is simply to prevent a car from being overwritten. Often times when your trail camera says that the card is locked, is due to this one simple problem. It can easily be bumped by putting your card in and out of your camera.
How to Fix
The solution is very quite simple, just flip the switch back to unlock. Sometimes you might have to flip it back and forth a few times in order for it to work, but most times this your problem.
The switch is however a cheap mechanical device, and sometimes when just simply move it back to the unlocked position doesn’t work. This is often because the switch on the inside of the card has been broken. In this case, just simply grab a new card, it is impossible to fix in the field and not worth the headache to begin with.
SD Card Isn’t Collecting Photos
Not Formatted Properly
If your camera is taking pictures, but not transferring them to the SD card, this is a sign that the camera is reading that there is a card there, but can not place photos or videos onto the card. This is typically a sign of improper formatting.
How To Fix It
I can’t stress this enough, the life of your SD card revolves around formatting your card to a specific camera, and using that card only in that camera. There are files written onto that card that help the card receive transferred data from the specific software from your camera. If you are not formatting your card every time you place it into the camera you are not creating and maintaining those files. When you use the same cards in multiple different cameras you are creating a cluster of files that makes it more difficult to place photos in the correct location on the card.
SD Card Is Not Reading
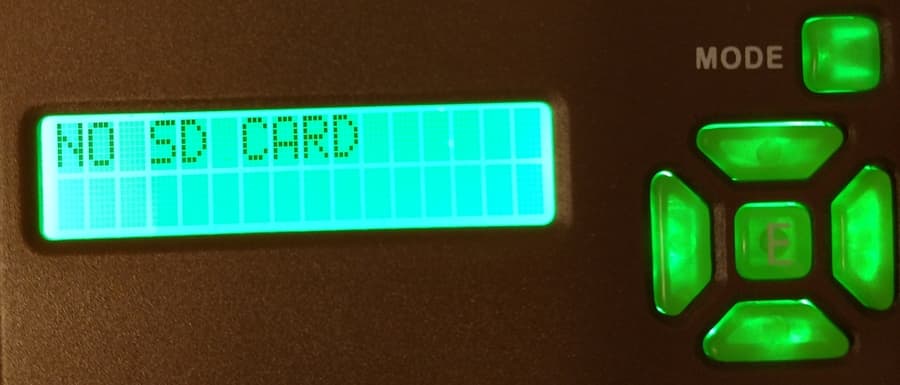
Formatted to Different Camera
A lot of times when you are running multiple cameras, with multiple different cards, you begin to get them mixed up. The problem with this is when you use a new card in a camera, and format it, the way you should, it writes a permanent file on that card for that camera. I often see this just by simply putting the card in you computer and seeing that the card file is named Exodus or Moultrie. That card is written specific to that camera.
How To Fix It
The way to fix this problem is to never mix and match cards and cameras from the beginning. Labeling each camera inside the housing door, and then subsequently labeling each card you format to that camera will alleviate a lot of problems.
Poor Connection
Again, having a poor connection would be do to the contact points on the back of the camera not creating a contact the the points inside the socket of your camera. Just blow it out, and check to make sure that the contact points on your card are not damaged.
Other Causes You Can Not Fix
Most of the time when you have an SD card problem it relates back to poor formatting practices, poor connection, or a faulty card. These are all simple fixes that you can do in the field, while at the camera.
But what happens when you try a new card, blow out the socket inside your camera, and format the card to the camera, and still your card does not seem to be working?
Many times when you get beyond the point of the SD card being the problem, you will run into specific camera problems that can only be fixed by the manufacturer. Giving them a call and dealing with their tech support is your only option. You might have a bad SD socket, or a problem within the firmware, or software of your camera
One Bit of Advice
Most manufacturers have a one year warranty on their cameras, which means if you have a problem with the camera 13 months after you purchased it, you are out of luck.
This is why, often you will see on this site that we recommend purchasing trail cameras from Exodus, Both of their models, the Lift II and the Trek have a industry leading 5 year “No BS Warranty.” Its difficult to purchase a car these days and have a warranty for 5 years, let alone a piece of camera equipment that you leave in the woods and allow mother nature to beat on.
Trust me, they are really a pleasure to work with. When you call their help desk, its not uncommon to be talking directly to one of the owners of the company. And in my experience, they will always take care of you.
Trouble Shooting Your SD Card Problems
While most of the problems that occur with trail cameras revolve around the SD card, they are not too difficult to trouble shoot, and sometimes even easier to fix. Here is a step by step guide on how to pinpoint the exact problem with your trail camera.
- Turn your camera off, wait a few moments and turn it back on. Sometimes when we are in a hurry and try to do too much at once the camera gets lost, or cant keep up with commands
- If that doesn’t work, replace the card with a new previously unused card. This will allow you to quickly assess if the problem is the card or is the camera.
If it is the Card…
- Physically examine the card to make sure that the lock switch is not engaged, and check the contact points on the back of the card to make sure they are not worn or scratched
- If neither are a problem, try to reformat the card inside the camera.
- If none of this works, it is probably a bad card, that has worn out over time. Replace the card, and make sure you throw out the old one
If it is the Camera…
- Try blowing or using compressed air into the SD card socket, to dislodge any possible debris that may have gotten on to the contacts inside your camera.
- If that doesn’t work, you will need to contact the manufacturer. The likely problem is either a bad socket inside the camera, or a firmware problem from corrupted files. They will walk you through trouble shooting for their specific cameras.
How To Prevent SD Card Failure
Once you have had a few SD card problems it becomes very simple to diagnose. But how do you prevent them to begin with?
Best Common Practices
The best way to prevent SD card problems in your trail camera, is to follow this simple outline from the beginning:
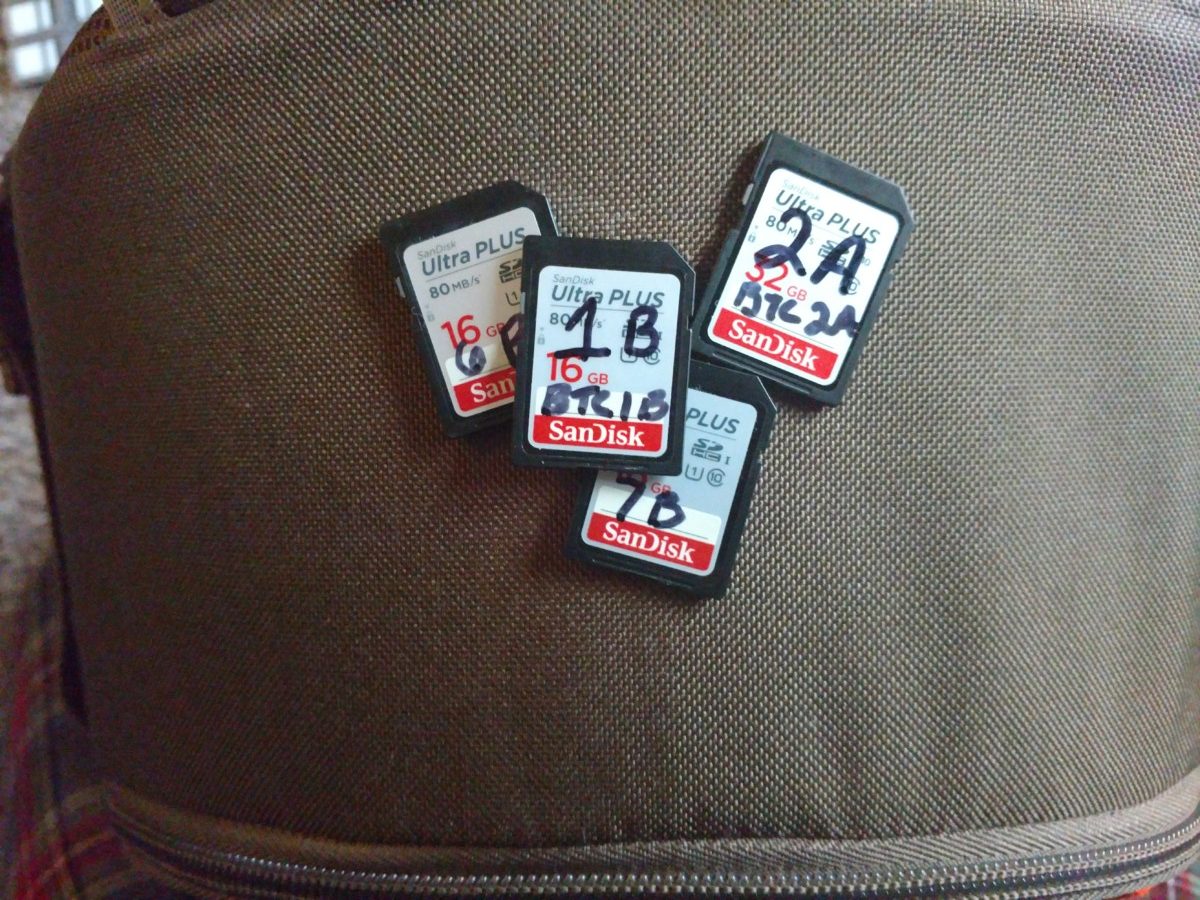
- Buy quality brand name SD cards. I always use Sandisk 32GB or larger. Personally I have just had better luck with Sandisk
- Always buy two cards for every camera. One that is in the camera and the other you can use to switch it out.
- Format both cards to the camera. You can find out how to do this in your camera’s manual, but most commonly you will be able to see this option in your camera’s menu.
- Label the Camera. For instance if it is a Browning I would label it BTC1 (browning trail camera 1)
- Label both cards the same as the camera. For example BTC1A and BTC1B. This allows you to make sure you are always using those cards in that camera, and if one is goes bad, you can easily identify which on needs to be thrown out
- Every time you change cards when checking trail cameras, make sure you format the card going in. This helps maintain the files that are written onto the card.
Be careful in changing SD cards between cameras, you can inadvertently take some written code from one camera, and by placing it in a different camera, transfer that code into the software of another. This can cause major issues with your camera’s ability to function properly.
Store SD Cards Properly
This should probably go without saying, but don’t store your SD cards in a ziploc bag and allow them to get bumped around in your pocket. Take care of your SD cards and they will work and take care of you.
Whenever I am in the field, I always bring along a carrying case specifically designed for SD cards. They are relatively inexpensive, and are designed specifically to protect your cards from external damage. The case I use the most is the Guardian water proof SD case. It hold up to 16 cards, and is foam protected. It is just a really good quality case.