
Work hacks. Life hacks. Why not Trail camera hacks? These 16 trail camera hacks, using everyday products, can make your use of trail cameras just a little more easy, and will get your brain turning to think of hacks of your own.
#1 Use Bay Leaves to Deter Ants
Ants can be the worst enemy for a trail camera user. They can eat away at rubber seals and burrow their way into the housing unit, creating devastating damage to your electronics. For some, ants can be more of a problem than for others, but being prepared is essential, especially during the warmer summer months.
For whatever reason bay leaves are a natural deterrent of ants. It is an old remedy my grandmother used to use to keep ants from getting into her kitchen cupboards. Just use some old fishing line and string a few bay leaves like you would with popcorn, and tie it off to your camera. Or if you are using a camera lock box, stuff the bay leaves inside. You will be amazed at how well this actually works.
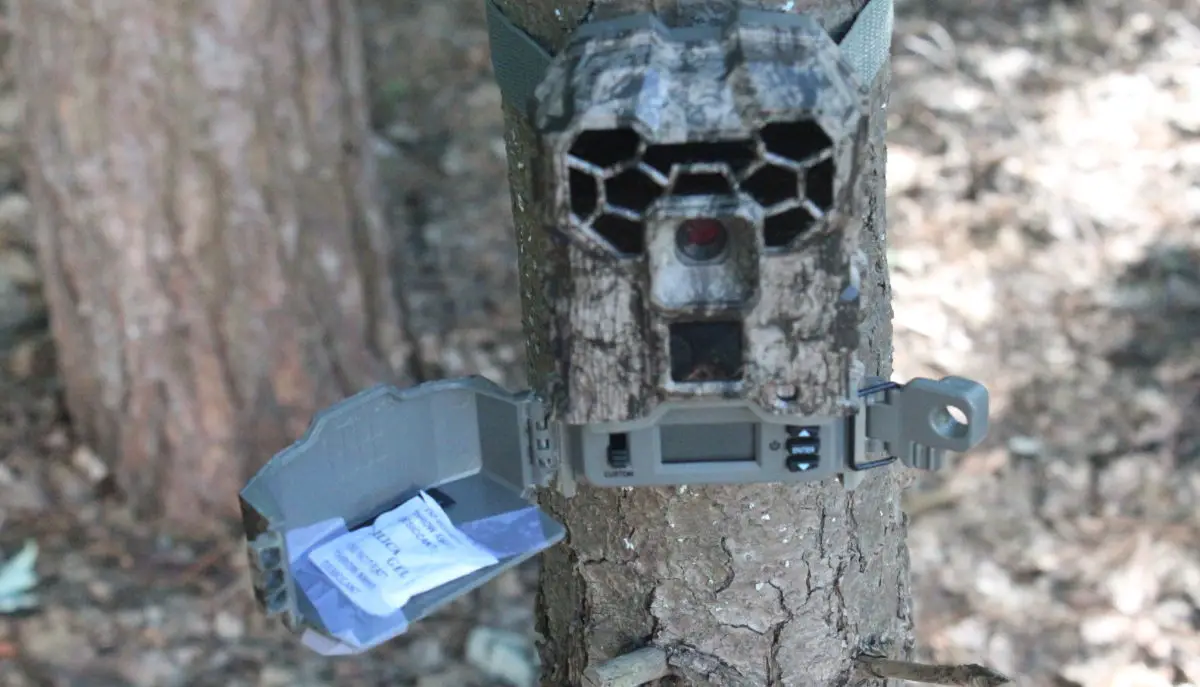
#2 Tape A Desiccant Packet Inside the Housing Door
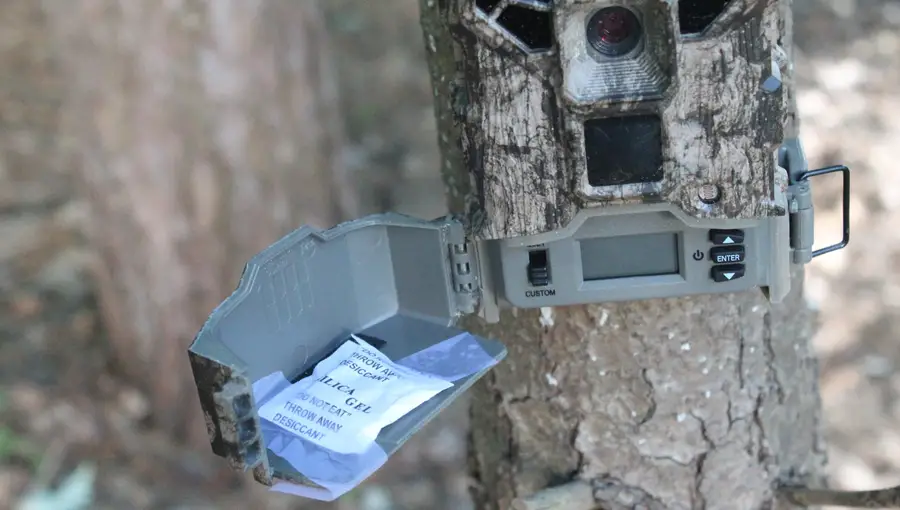
In areas where it becomes humid and moist, there is no greater concern than moist air interfering with the electronic components of your camera. If you missed high school science class, water build up and electrical current is a combination that quickly can lead to electrical problems.
While most cameras are well equipped to withstand the weather elements, it is nearly impossible to beat mother nature’s imposed humidity. Simply take a small desiccant package and tape it into the inside of the trail camera door. These small packets can absorb up to 40% of its weight in moisture and will bring down the humidity in a contained space by up to 40%.
You can find these small packets for relatively cheap for less than $.50 a piece on Amazon, or you can simply grab one out of a package of beef jerky you buy at the store, and reuse it.
#3 Use Dryer Sheets Inside Your Trail Camera
If a trip to the grocery store for bay leaves is out of the question, another common repellent for ants is the same dryer sheets you use in your laundry to prevent static. Dryer sheets hold chemicals that repel many nuisance pests such as ants, spiders and even mice.
Simply cut down a dryer sheet to a manageable size and stick it into the door of the housing unit. Ants will simply avoid your camera all together.
#4 Coat Your Mounting Brackets With Vaseline
No one knows how to keep ants away better than those who feed hummingbirds. The sweet sugary concoction used to attract the fleet winged birds is also incredibly attractive to ants. Taking a page from their book, the use of Vaseline along the bird feeder stand has been known to keeps ants from climbing to the feeder. The same tactic can be used on any mounting bracket for a trail camera. Just coat the bracket with Vaseline, and that alone will detract ants from crossing to your camera
#5 Turn You AA Lithium Batteries to C Batteries
While most trail cameras on the market today use AA batteries, there are few cameras that are still floating around that opt for the bigger C batteries. These batteries work fine for the mild weather months, where temperatures stay above freezing. However when the weather turns colder, C batteries, which are only produced in alkaline, become less reliable.
Alkaline batteries create a water based resistance, that will freeze during cold temperatures, creating all sorts of issues with batteries bursting and leaking inside you camera housing.
What you can do however, is turn AA lithium batteries into C batteries with a AA to C battery converter. These adapters are less than $.20 a piece on Amazon. While the smaller AA batteries might not give you as much life expectancy as a C battery would, this conversion will get you through the rough parts of the winter.
If you are interested in learning more about batteries for trail cameras, and their life expectancy, I spent hours researching discharge patterns, and put together a helpful resource in the post The Average Life of a Trail Camera Battery.
#6 Use A Shim For Angling Your Camera Down
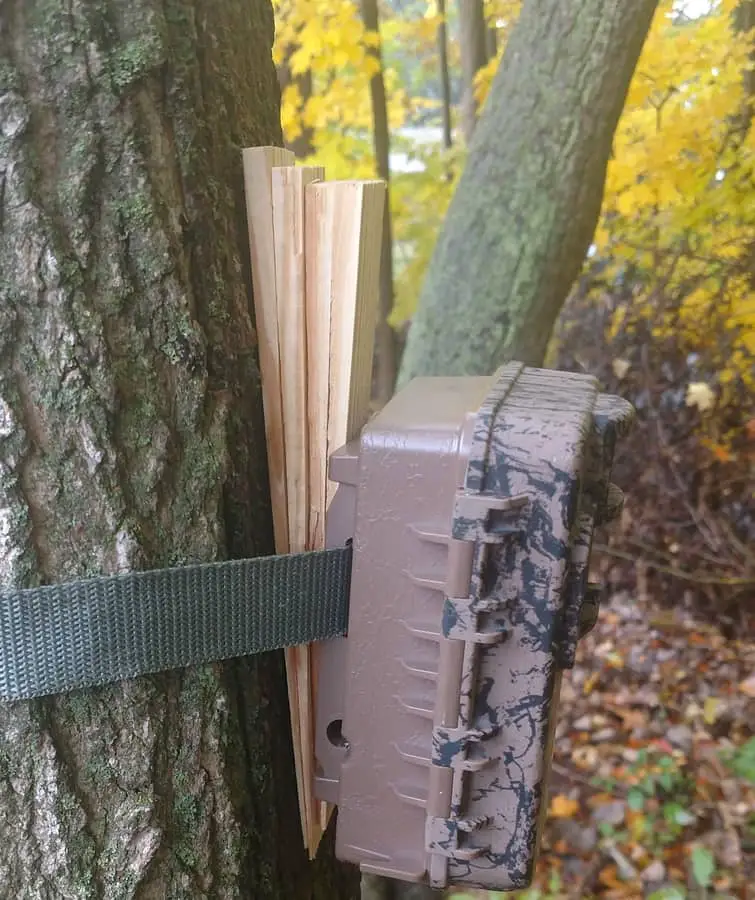
Whenever you are hanging a trail camera set, there becomes that inevitable point where the tree is angled just slightly forcing your camera to to point slightly off from where you intended it to be. You grab a nearby stick, cram it behind the camera to adjust the angle, and walk away hoping that the stick stays in place
Get away from that hope, by using door shims. You can pick them up from your local hardware store for a few dollars for a bundle of them. The reason that using shims is so much more effective is that they are made to do just that; shim.
By pushing them in farther or doubling them up, you can get the exact angle you want, while being able to strap the camera tightly to the tree. There will be no more looking for a stick that is the right thickness, and no more hoping it will stay. Throwing a few shims in your pack, for those inevitable situations, will make your setups just that much easier.
#7 Apply Cat Crap To Your Lens
Just like any glass surface that is exposed to weather (think your car windshield) the lens of your trail camera will eventually have a situation where it will fog up. It can be frustrating, especially when you are receiving photos that are hazed over with this annoying water vapor.
The best solution I have found is to apply Cat Crap to the lens. Not feces from a feline, but the product Cat Crap. While Windex works fine, Cat Crap, is specifically made as an anti-fog lens cleaner, and I have personally seen great results from it.
#8 Make Your Own Hanger Bracket For Under $5
Are you tired of spending money on mounting brackets that are tough to screw into a tree? Is getting a new bracket for every camera becoming expensive? Well then it is time to try a new approach and make your own. I could try to explain it in great detail, but Garrett from DIY Sportsman has a great video on how to do just that.
#9 Angle Your Trail Camera To The Trail
There is this misconception that trigger speed is everything in a trail camera. The faster the trigger the less likely you are to miss an animal running by. There is some truth to the benefits of having a fast trigger speed, but by simply angling your camera at a 45 degree angle to a deer trail, will keep the deer in your cameras detection zone for a longer period of time. The longer the deer is in the detection zone the better chance even a slow trigger has of capturing the photo.
#10 Set Your Camera Lower To The Ground
One of the more common issues users have with their trail cameras is false triggers. A false trigger is simply when a camera takes a picture without there being an animal to trigger the motion activation. This can be caused by many things including, shadows formed from the sun going behind a cloud and leaves rustling in the wind. One of the most overlooked causes however is simply the tree in which the camera is mounted on, sways in the wind.
Ideally the best remedy for this is to use a sturdy tree that would take a considerable amount of wind to move it, but as you know that is not always an option. In these circumstances, simply hanging the camera at a lower level on the tree can pay dividends. The closer to the ground you mount the camera, the more solid the tree will be, and less chance that a wind will create movement at the trunk.
#11 Format And Label SD Cards
One of the most common problems users often have with trail cameras is the inconsistency of their SD cards. Cards being locked, failure to write pictures onto the card and damaged or corrupt cards are all common struggles. We spent a ton of time constructing a great resource for those who are having a lot of these problems on our post Choosing the Right SD Card for Your Trail Camera.
The number one problem with most SD cards is caused from not formatting the card to each camera. Formatting is actually a very simple and quick process, that helps with speed performance, preserving its storage capacities, and reducing risks of storage errors. The problem is if you share cards with different cameras, you are forced to format your card every time you place it into a new camera.
When you buy a new camera, simply purchase two new SD cards with it. Before ever taking them into the field format both cards specifically to that camera. Label the camera A, (or B, C…etc) and label one card A1 and the other A2. For now on only those two cards are allowed to go into that camera. They are already formatted, and you can always have one in the camera, and the other can come home with you when you switch them out. You will never have to stand in the field and try to figure out how to format a card again. This also makes it very simple when a card inevitably goes bad, you know exactly which one it is, and you can simply replace it.
#12 Organize Your Gear With A Trail Camera Pack
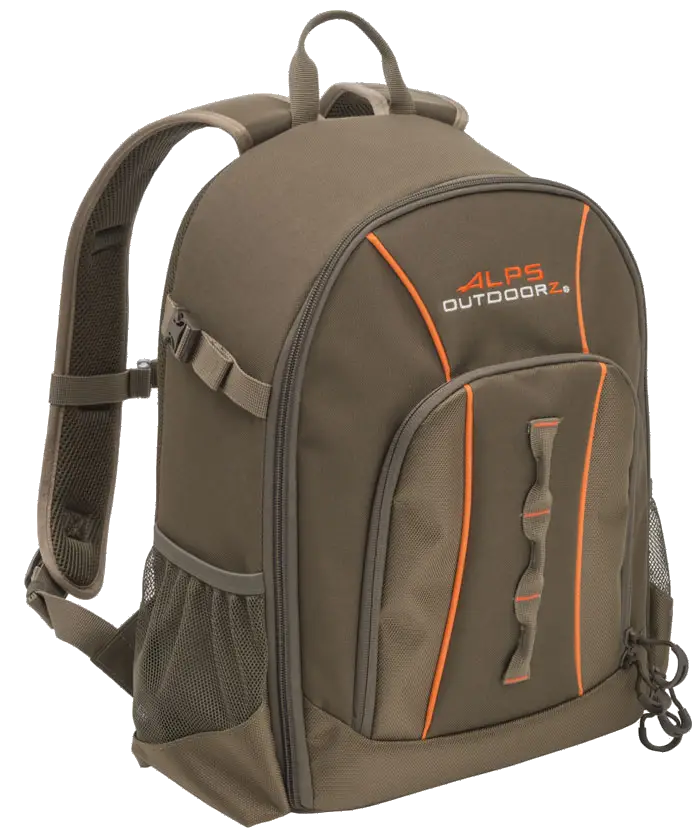
When running trail cameras there is an endless list of things you need to bring with you; cameras, batteries, SD cards, mounting brackets, shims, straps, SD readers and the list goes on and on. It is inevitable, that if you are like me you will forget something. I have found that having a designated pack for just trail cameras allows me to pack and keep everything I will need in the field all in one location.
There is no more searching for where I placed my desiccant packets, or trying to find which toy my son has that I can steal some batteries from. Everything is always there, making the time in the woods more efficient.
I personally have really enjoyed the Alps Outdoorz Motive pack, that you can find here on Amazon. Out of all the different packs I have tried, it is the only one that has met every criteria I had for storage capacity, comfort, and ease of organization. I have tried a few others as well that I feel very comfortable with, that you can check out on our Recommended packs page.
#13 Use Only 2.5X Of Your Image Sensors Capacity
Have you ever had a trail camera photo where you just couldn’t zoom in to see the details you were looking for? Maybe it becomes blurry when you zoom in, or the colors are just a bit distorted for you to be able to see good details of a deer’s antlers.
I dispelled the myth of megapixels in a previous post: Knowing These 9 Trail Camera Myths Will Save You Money. But the reason for the blurriness is that in order for trail cameras to have such high megapixel counts is they must use a process called interpolation, to split existing megapixels. These megapixels are not individual pixels that the camera takes, leaving the photo process up to a computer generated system to fill in the gaps. When you zoom into the picture, the blurriness you are experiencing is the inconstancy of fine detail you would be able to get if the camera were able to take full resolution images. These problems are multiplied during night time photos when there are only black and white colors that are being interpolated.
To fix this problem, read the owners manual and find out the actual size of the image sensor your camera has. This is the amount of mega pixels your camera truly captures in a picture, typically this number will be between 3.1 and 5. Multiply that number by 2.5, and that should be roughly the amount of megapixels you should set your camera to. This easy calculation will eliminate most of your blurriness when zooming in on a picture.
#14 Use Cedar Oils To Keep Spiders Away
If you have ever used a lock box for you trail camera, you have possibly had the experience of dealing with spiders building webs across the openings. In general, spiders are pretty innocent and do not cause damage to your camera the way ants do, however their webs can become a nuisance when formed over the camera lens, or the motion sensor.
In general cedar is the most natural deterrent of spiders. I have tried building small cedar boxes to place my trail cameras in, however this becomes a daunting task when you are running 15-20 cameras at a time. So, what I have found is that in those camera sets where I use lock boxes (the most common sets when spiders have become a problem) I simply spray a little Cedar oil inside the box. The oils, on the outside of the camera, doesn’t hurt it at all and has proven to be effective in keeping spiders from taking up permanent residence.
#15 Use A Threaded Rod As A Camera Stand
I have become a big fan of using the Stic-n-pic for placing cameras in areas where there is no viable tree for a good mount. It is a great tool that every trail camera user should have in their arsenal. For most, however, after purchasing a camera, SD card, and batteries the extra expense of buying yet another accessory can start to have an impact on your wallet.
Using a 1/4-20 threaded rod from your local hardware will have similar results at a much more affordable price. While there will be some shortcomings with a standard threaded rod; it wont be nearly as sturdy and you will lose valuable functions like camera tilt, it is a viable option for those on a budget.
#17 Use Aerosol Spray For In The Field Cleaning
Lets face it, our trail cameras take a beating. We set them out in mother nature and let all the rain, snow, dirt and pollen beat down on them for months at a time, and we expect them to function perfectly the entire time. The truth is after a long duration in the field, even the best sealed trail cameras begin to capture dust and pollen in every nook and cranny. All of this unwanted debris begins to effect electronic contacts, hinges opening and closing, and even covers lenses and PIR sensors.
Simply use a can of aerosol spray, the same kind you use to clean out the keyboard on your computer, and clean out any accumulation of dirt. If you keep up with this simple maintenance tip, there will be no need to spend hours with a Q-tip cleaning it out later.