
If you are anything like me, you find something exhilarating about flipping through trail camera photos, and coming across a picture of a slob buck that you have never seen before. Beautiful brow tines, with thick, long main beams erected from his scalp like the the Eiffel tower. There is just something magical. The implications of having a mature buck standing in front of your camera, not only gives you hope for the upcoming hunting season, but gives you a sense of the health of the deer herd in your area.
After the initial shock you begin to wonder how big his head gear really is. Is he bigger than the one your buddy got on trail camera the year before? The only way to know for sure is by getting the opportunity to measure first hand. But then you begin to wonder:
How do you score a deer from a trail camera Photo?
You can get a rough score of a deer’s antlers from a trail camera photo by using references from the deer such as its ears, eyes and nose, and compare those lengths, widths, and circumferences to the antlers.
Boone and Crockett Scoring System
The Boone and Crocket club is a conservation organization that has been the record keeper for scoring big game animals since the late 1800’s. They have cultivated a specific scoring system for each big game animal, often referenced to as the Boone and Crocket Score (B&C).
For whitetail deer, the measurement of the antlers is the reference to the score, and they do so by adding multiple factors: the length of the main beam, length of tines, the circumference of the the main beam in four different location and the width of the spread between the antlers.
Main Beam- To measure the length of the main beam, you measure the outside of the beam from the pedicle to the tip of the farthest point. You will do this on both the right and left main beam. This will give you your first measurement of the main beam.

Tines- The tines can be slightly confusing to the beginner, simply because of the terminology of the scoring system. But don’t let the verbiage turn you off it is simple to understand.
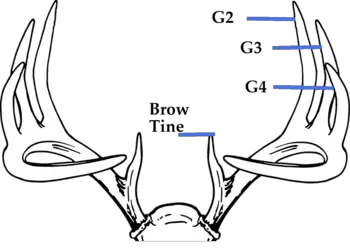
You will often see the term brow tine, which is simply referring to the first antler point that is coming off the skull of the animal. This point is typically, but not necessarily always present, and is most often vertical to the skull cap.
From the brow tine, every point after is labeled in in numerical order with the letter “G” in front of it. If you can recognize that a brow tine is considered a “G1”, then the next antler point working toward the point of the main beam will be a “G2” the next a “G3” and so on. This terminology is just simply in place to keep the measurement of each tine categorized for the records.
To measure a tine, you will start from the outside of the antler point, using the place where the tine separates from the main beam and measure to the tip. Measure each tine, on both the right and the left side of the antler. These measurements added together will give you the overall tine length of the antlers.

Circumference- measuring the circumference on the antlers is probably the most tricky aspect of the B&C measurements. This measurement gives scoring preference to the mass of a set of antlers. You will take a total of four measurements from each side of the antler. Each measurement is to be measured at the smallest point. The first measurement is to be made between the pedicle or the burr, and the brow tine. The next is between the brow tine and the “G2”. Then measure between the “G2” and “G3” then between the “G3” and “G4”. Measure both sides of the antler in the same place. The accumulated measurements will provide you with the overall mass of the antlers.

Spread- The final measurement is the spread, or the distance between the right and the left side of the antlers. This measurement is the farthest distances between the antlers. This is often refereed to as the inside spread.

Overall measurement – To get the final score of the deer, just simply add the length of the main beams, the accumulated length of all of the tines, the accumulated circumference, and the inside spread.
References
Now that we know the general scoring system of deer, we can apply that knowledge to photographs from our trail camera. Since we obviously can not put an actualy tape measure on a living animal’s antlers, we will have to rely on specific reference points from what we know about deer to get a good estimate on the antler score.
Ear – on a mature deer, the length of an ear typically measures around 7”. This length is from the base of the ear to the tip. This reference, comparing the length of the ear, makes it easy to estimate the length of different tines. As well as a helpful tool in determining the overall length of the main beam.

Eye to Tip of Nose – If you get a side profile picture of the buck, being able to see the length between the eye and the tip of the nose, is incredibly helpful in determining the length of the main beam. The length between the eye and the nose is roughly around 8”
Ear tip to ear tip- When alert the distance between the tip of one ear and the tip of another ear measures around 14”. This length will give you a great indication of the inside spread of the antlers.

Eye circumference- Judging the overall mass of a deer’s antlers is possibly the toughest part of estimating the score from a trail camera photo. However, using the circumference of the deer’s eye as a reference will help you estimate the average measurement of the antler’s circumference. The circumference of a deer’s eye measures roughly 4”.
Scoring A Deer
Now that we know how to measure a deer’s antlers, and have specific reference points to compare length and sizes, lets take a look at a couple trail camera pictures and estimate the deer’s overall B&C score using a few different methods.
Eye-balling It
One of the easiest ways to estimate a deer’s antler score is by using the above references and using your eye to estimate. This method is likely the most often used, and while it is sometimes difficult, with practice can be effective, and very quick.

Beam length – This first picture is the perfect angle for estimating the length of the main beam. Since the length from the eye to the tip of the nose is around 8” we can determine that from the tip of the antler back to the “G2” is roughly 16”. Judging from the length of the ear we can safely estimate that the length from the “G2” to the base of the antler is another 7”. This will give us a beam length total of 23”
Tine length- Again using the estimated length of the ear, we will determine the overall tine lengths. Starting with the Brow tine, it is obvious that the length is less than that of the ear, but not quite half of the size, so I will estimate roughly 5”.
The “G2” is larger than the ear, and so I will estimate the length around 10”. Despite the slight angle of the the “G3” we will conservatively call that 10” as well.
The “G4” is a little tougher to determine, but judging by the length of the ear, it is less than half of its length, so an estimate of 3” seems about right.
Adding the overall dimensions of the tines lengths we have 5″ (brow tines) + 10″ (G2) + 10″(G3) + 3″(G4) = 28” overall tine length.
Circumference- The circumference or mass of the antler in this picture is going to be the most difficult to judge. Using the eye circumference as our reference point, it is hard to determine the overall measurement of a few of the measurements. What I tend to do is take the diameter of the eye to see if the diameter of the antler matches.
The first measurement between the base of the antler and the brow tine is difficult to see because of the position of the deer’s ear, but I will simply take a guess by saying the that measurement is around 4 1/2”. This guess is simply just a guess based on the what we can visually see.
The second measurement the diameter of the eye is quite a bit smaller than the diameter of the antler so I would estimate 5 1/2”. I would estimate the same for the third measurement as well.
The final circumference measurement between the “G3” and “G4” seems to be a bit smaller than the other measurements, but still larger that the eye. In estimating proportionally, I would say 5”.
Adding all of the circumference measurements together we have 4.5(1st measurement) + 5.5 (2nd measurement) + 5.5 (3rd measurement) + 5 (4th measurement) = 20.5” of overall circumference measurements.
Spread- Using the next picture in the series we are able to get a better view of the spread of this deer. While the deer’s ears are not in an alert position, they seem to be pinned back a bit, we will use an estimation of their position as a reference.

Taking some liberties of where the ears would be in an alert position I would say they would fall just inside the position of the G2’s. Judging by the picture, it would give us roughly 3” of room on each side between the ears and the main beam. So I would estimate roughly a 20” inside spread.
Overall Measurement– We have taken some estimated guesses in determining the overall score from this photograph, but I would feel confident in saying we are within 10′ of what an official score might look like. So lets calculate the final measurements.
| Left Side | Right Side | Total | |
| Main Beam | 23″ | 23″ | 46″ |
| Tine Length | 28″ | 28″ | 56″ |
| Circumference | 20.5″ | 20.5″ | 41″ |
| Total | 71.5″ | 71.5″ | 143″ |
The total is 143″ and when we add the inside spread of 20″ we arrive a total B&C score of 163″
**Note: In this case we only have visual of one side of the antler, so we will need to make a guess that the right antler is similar size to the left antler. In doing so, the overall measurements that we come up with from the left antler, we will just simply double to give us an estimate of the overall measurement.
Using a Scale System
Although you can become very accurate by just using visual clues to eyeball a deer’s antler size, there is nothing that is more precise than using a scale system to get an extremely accurate estimate.
You might be most familiar with a scale system on maps, where the legend may be expressed as 1 inch is equal to 100 miles. That scale is a 1″:100 mile ratio. You too can create your own scale according to a trail camera picture.
Using a tape measure, or calipers ( I prefer calipers, they give a more precise measurement) measure one of the reference points we had discussed earlier. Since a photo is naturally scaled, measuring a reference such as the length of ear, or the length from the nose to the eye, will allow making a scale simple.

Insider Tip: Because a photo is an exact scaled depiction, you can zoom in on the photo to get more accurate measurements. Just note that whenever you zoom a photo in, you need to remeasure a reference point, so the scale is accurate.
Knowing that the measurement from the tip of the nose to the eye, on a mature deer measures 8″, and the measurement on the scaled picture reads .872″, the scale ratio reads as:

Now that we know the ratio, we can begin to measure the different elements of the antler according to the Boone and Crockett scoring system. Measuring the left side main beam, we measured 2.478″. You calculate the actual length of the beam by using the following equation:

In order to solve this equation, you need to cross multiply 8 x 2.478 and multiply .872 x X. by doing this, you will come to the final equation:

Now simply solve for X by dividing .872 on each side and you will come to a final length of the main beam of 22.73″.
Continue this equation for each of the measurements you get from your photo. Here is a quick rundown of what this particular buck measured using this method.
| Main Beam | 22.73 |
| Brow Tine | 4.385 |
| G2 | 10.28 |
| G3 | 10.44 |
| G4 | 2.94 |
| Total | 50.775 |
Again we can not see the right side of the deer’s antler so we estimate that it is equal to the left side of the deer, and we get a total of 101.55″.
Measuring Circumference
Now we need to measure the circumference of the four places on this deer. You will have to measure the diameter between the tines, and use the same equation you used measuring the tines and main beam. This will only give you the actual diameter. In order to calculate the circumference you will need to multiply the diameter by pi. Working through this equation will look similar to this


The circumference measurements for this buck are as follows:
| Circumference 1 | 5.648 |
| Circumference 2 | 6.484 |
| Circumference 3 | 6.396 |
| Circumference 4 | 5.648 |
| Total | 24.176 |
Same as the tine length and main beams, we are not able to see enough of the right side of the deer’s antlers to have accurate measurements, so in this case we will also double the left side creating a total of 48.352″
The total measurements from using a scale system:
| Left Side | 50.775 |
| Right Side | 50.775 |
| Left Side Circumference | 24.176 |
| Right Side Circumference | 24.176 |
| Inside Spread | 23.73 |
| Total Score | 173.632 |
Conclusion
Both versions of calculating a deer’s antler score have a margin on error. Using the scale method will be more consistent than visually determining lengths and widths of a particular photo.
Here is how the two different methods compare on this photo:
| Scale System | Eyeball | |
| Main Beams | 45.46 | 46 |
| Tine lengths | 56.09 | 56 |
| Circumference | 48.352 | 41 |
| Spread | 23.73 | 20 |
| Total | 173.632 | 163 |
With either method, the largest margin of error is going to come when calculating the circumference of different points on the antler. Even using the scale method, getting an accurate measurement of the diameter is very circumstantial as the measurement you take is likely not a true diameter.
Which ever method you prefer, the fun is in dreaming of an encounter that allows you to test your estimated measurements against the actual measurements.